Written by Steve Pham, Senior Software Development Engineer at Amazon and contributor to the O3DE community
This article originally ran on Steve’s O3DE blog. For more content like this, click here.
Distributing Simulation Projects
For robotics simulation projects using ROS2 and O3DE, collaboration on constructing and refining the simulation can be shared across a team through source control such as GIT or Perforce. However, in order to access, develop, and contribute to the simulation project, you need an environment that has O3DE, ROS2, and its dependencies installed and configured properly. The environment must also be consistent for every member of the team collaborating on the simulation. In my previous blog post, I explained how Amazon’s EC2 helps provide a pre-configured environment through an AWS Marketplace AMI.
The primary goal of simulations is for training robots through ROS2. The O3DE Editor is not needed to run the simulation, it can be launched through a separate launcher application. The same development environment is not necessary either. Once the simulation project is ready for distribution, it can be exported into the launcher application separate from the O3DE Editor and build environment. Exporting a simulation project into its own launcher will package just the launcher executable and its bare minimum dependent binaries, assets, and necessary settings needed to launch the simulation. All the additional Editor and Asset Processor related binaries that comes with a full O3DE installation is omitted.
Containerization
The exported project alone usually is not enough to have it run on different machines. Along with the base operating system (in this case, Ubuntu Linux) there are additional pre-requisite package requirements. In order to have the simulation project run consistently across different machines, each machine must have the same operating system, packages, and environment. We will use Containerization to address this issue. This provides many benefits for our use case:
Portability
The simulation project will be contained in its own isolated environment and operating system. The specific operating system, Ubuntu 22.04, and all of its required packages will be embedded in the container image and isolated from the host machine. That means no additional simulation-specific prerequisites are needed to launch the simulation (other than the Container service and the NVIDIA Container Toolkit). This allows it to run on multiple devices and operating systems.
Consistency
Container images are immutable. This ensures that the application will run in a consistent manner across any environment or operating system.
Scalability
Containers are lightweight and run efficiently. Unlike virtual machines, they do not need to boot up to load the operating system. Containers can be easily distributed and managed through container orchestration tools as well.
Exporting the Project
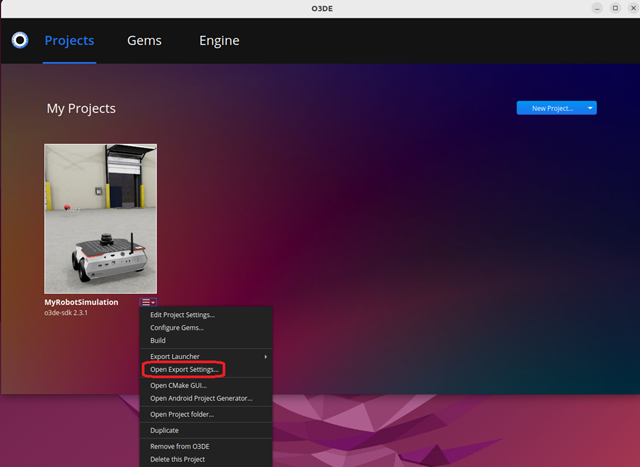
Once the simulation project is working as expected through the Editor and from command line, we can use O3DE to export the project to a single folder. Open Project Manager, click on the context button for the project MyRobotSimulation and click on Open Export Settings…

This brings up the export settings specific to this project. Next, we configure the settings needed to export just the simulation (game) launcher.
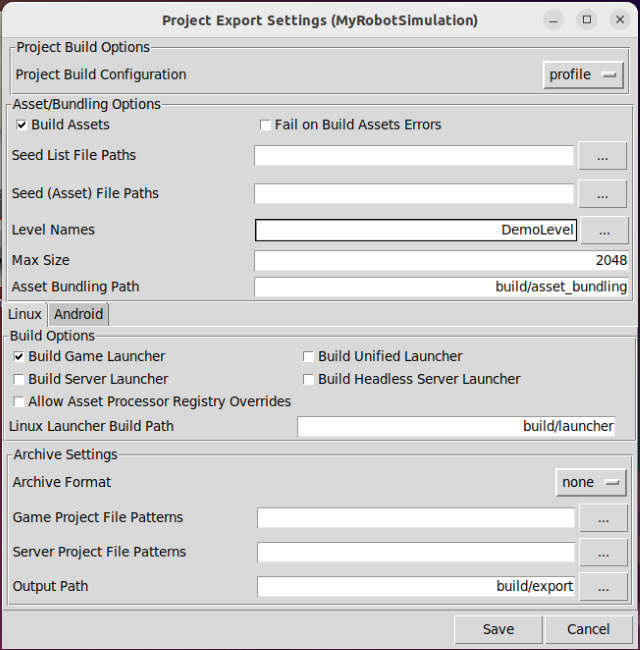
The export settings is designed for any type of project, not just simulations. There’re only a few settings needed to create our simulation launcher:
| Project Build Configuration | profile |
| Build Assets | true |
| Level Names | DemoLevel |
| Max Size | 2048 |
| Asset Bundling Path | build/asset_bundling |
| Archive Format | none |
| Build Game Launcher | true |
| Build Server Launcher | false |
| Build Unified Launcher | false |
| Build Headless Server Launcher | false |
Once the configuration is set, click on Save to save the settings. To run the project export, click on the context menu button for the project again, and click on Export Launcher->Linux
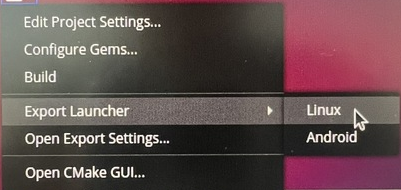
When the process is complete, the exported project will be located in a folder named MyRobotSimulationGamePackage in the path ~/O3DE/Projects/MyRobotSimulation/build/export/
Creating a Docker Image
The exported project can now be stored into a compressed archive and distributed to other Ubuntu 22.04 hosts to use. However, the exported project still requires the minimal environment and settings to run successfully and consistently. We will create an OCI Complaint container Image for the environment and settings, and include the exported project and the sample navigation scripts for ROS and RViz. We will use Docker Engine in conjunction with the NVIDIA Container toolkit to build and test the image.
Installing Docker Engine
Install Docker Engine for Ubuntu using the Docker Installation instructions. The following is a quick cheat-sheet to install Docker Engine using the apt repository based on the Docker’s apt instructions.
1. Set up Docker’s apt repository
# Add Docker's official GPG key:
sudo apt-get update
sudo apt-get install ca-certificates curl
sudo install -m 0755 -d /etc/apt/keyrings
sudo curl -fsSL https://download.docker.com/linux/ubuntu/gpg -o /etc/apt/keyrings/docker.asc
sudo chmod a+r /etc/apt/keyrings/docker.asc

# Add the repository to Apt sources:
echo \
  "deb [arch=$(dpkg --print-architecture) signed-by=/etc/apt/keyrings/docker.asc] https://download.docker.com/linux/ubuntu \
  $(. /etc/os-release && echo "$VERSION_CODENAME") stable" | \
  sudo tee /etc/apt/sources.list.d/docker.list > /dev/null
sudo apt-get update
2. Install the Docker packages
sudo apt-get install -y docker-ce docker-ce-cli containerd.io docker-buildx-plugin docker-compose-plugin
3. Create a docker group (if not already created). Add the current user to the docker group
sudo groupadd docker

sudo usermod -aG docker $USER

newgrp docker
4. Verify that you can run Docker without sudo by running the hello-world image.
docker run hello-world
Note: If you run into any issues during these steps, refer to the Docker Installation instructions for help.
Installing NVIDIA Container Toolkit
In addition to Docker Engine, you will need the NVIDIA Container toolkit in order to run the simulation within the Docker Image. The following is another quick cheat-sheet to installing the toolkit based on NVIDIA’s apt instructions.
1. Set up NVIDIA’s production repository
curl -fsSL https://nvidia.github.io/libnvidia-container/gpgkey | sudo gpg --dearmor -o /usr/share/keyrings/nvidia-container-toolkit-keyring.gpg \
  && curl -s -L https://nvidia.github.io/libnvidia-container/stable/deb/nvidia-container-toolkit.list | \
    sed 's#deb https://#deb [signed-by=/usr/share/keyrings/nvidia-container-toolkit-keyring.gpg] https://#g' | \
    sudo tee /etc/apt/sources.list.d/nvidia-container-toolkit.list
2. Update the package list from the repository
sudo apt-get update
3. Install the toolkit from apt
sudo apt-get install -y nvidia-container-toolkit
4. Configure the toolkit for Docker (rootless)
nvidia-ctk runtime configure --runtime=docker --config=$HOME/.config/docker/daemon.json

systemctl --user restart docker

sudo nvidia-ctk config --set nvidia-container-cli.no-cgroups --in-place
Create the Docker Image
A Dockerfile is the recipe for the Docker Engine to build an image. The Docker Image will include the minimal required packages for O3DE launchers and ROS2, based on the type of simulation that MyRobotSimulation was built for. Docker uses a path to refer to as its context root, and in our example, we will use the root of the simulation project (~/O3DE/Projects/MyRobotSimulation/).
1. Create a Dockerfile
Navigate to the path ~/O3DE/Projects/MyRobotSimulation/build/export/ and create a file named Dockerfile with the following contents:
# This image will be based on ROS's ros humble base image
FROM ros:humble-ros-base-jammy

ENV WORKSPACE=/data/workspace

WORKDIR $WORKSPACE

RUN apt-get update && apt-get upgrade -y

# Get the necessary packages needed for the simulation launcher
RUN apt-get install -y --no-install-recommends libglu1-mesa \
                       libfontconfig1 \
                       libxcb-image0 \
                       libxcb-keysyms1 \
                       libxcb-render-util0 \
                       libxcb-randr0 \
                       libxcb-xinerama0 \
                       libxcb-xinput0 \
                       libxcb-xkb1 \
                       libxcb-xfixes0 \
                       libxkbcommon-x11-0 \
                       libunwind8 \
                       libxcb-icccm4 \
                       libnvidia-gl-470 \
                       ros-${ROS_DISTRO}-slam-toolbox \
                       ros-${ROS_DISTRO}-navigation2 \
                       ros-${ROS_DISTRO}-nav2-bringup \
                       ros-${ROS_DISTRO}-pointcloud-to-laserscan \
                       ros-${ROS_DISTRO}-gazebo-msgs \
                       ros-${ROS_DISTRO}-ackermann-msgs \
                       ros-${ROS_DISTRO}-rmw-cyclonedds-cpp \
                       ros-${ROS_DISTRO}-control-toolbox \
                       ros-${ROS_DISTRO}-nav-msgs \
                       ros-${ROS_DISTRO}-rviz2 \
    && rm -rf /var/lib/apt/lists/*

# Copy over the exported project into this image
COPY build/export/MyRobotSimulationGamePackage $WORKSPACE/Simulation
COPY Examples/slam_navigation/launch $WORKSPACE/launch

# Enable the necessary environments for the NVIDIA toolkit and ROS2
ENV NVIDIA_VISIBLE_DEVICES=all
ENV NVIDIA_DRIVER_CAPABILITIES=all
ENV RMW_IMPLEMENTATION=rmw_cyclonedds_cpp
2. Build the Docker image
Once the Dockerfile recipe is saved, use Docker’s command line tool to build an OCI-compliant container image. Name the image my_robot_simulation (Docker is case-sensitive and does not allow for mixed casing in the name) and use the latest tag for our sample.
Use the following command to build the image.
docker build -t my_robot_simulation:latest ~/O3DE/Projects/MyRobotSimulation -f ~/O3DE/Projects/MyRobotSimulation/build/export/Dockerfile
3. Test the Docker Image locally
Before uploading and distributing the Docker Image, test it locally by running in through Docker Engine and using the NVIDIA Container Toolkit.
In order for the image to have access to the local display, you need to add it to xhost.
xhost +local:root
To launch the simulation through Docker, run the following command
docker run --rm --gpus all -e DISPLAY=:1 -v /tmp/.X11-unix:/tmp/.X11-unix my_robot_simulation:latest /data/workspace/Simulation/MyRobotSimulation.GameLauncher
While the simulation is running from the Docker Image, you can now connect to it through ROS2 using the sample navigation example from the MyRobotSimulation project (as described in the previous blog). Open up a new terminal and enter the following lines.
cd ~/O3DE/Projects/MyRobotSimulation/Examples

ros2 launch slam_navigation/launch/navigation.launch.py
Publish the Docker Image
Docker Images do not upload to a repository the same way as regular files or archives do. Instead, they rely on OCI-Compliant container registries. For this example, we will use Amazon Elastic Container Registry (ECR) to upload and distribute our Docker image.
Note: As with the AWS EC2 instance from the previously blog, we will be using the same Amazon account login for ECR
Before starting, make sure that you have the AWS CLI installed using the following command:
sudo apt install awscli
Make sure that you have your AWS credentials and region setup running aws configure
1. Create a repository called my_robot_simulation
Run the following command from the terminal to create a repository called ‘my_robot_simulation’
aws ecr create-repository --repository-name my_robot_simulation
Note: Docker enforces a strict naming convention, and does not allow for mixed casing in the name.
You should get a response similar to the following:
{
    "repository": {
        "repositoryArn": "arn:aws:ecr:us-west-2:000000000000:repository/my_robot_simulation",
        "registryId": "000000000000",
        "repositoryName": "my_robot_simulation",
        "repositoryUri": "000000000000.dkr.ecr.us-west-2.amazonaws.com/my_robot_simulation",
        "createdAt": 1734476138.426,
        "imageTagMutability": "MUTABLE",
        "imageScanningConfiguration": {
            "scanOnPush": false
        },
        "encryptionConfiguration": {
            "encryptionType": "AES256"
        }
    }
}
Note the repositoryUri value and set it to an environment variable for convenience, for example:
export ECR_SIMULATION_URI=000000000000.dkr.ecr.us-west-2.amazonaws.com/my_robot_simulation
2. Log into Amazon ECR with the following command
aws ecr get-login-password | docker login --username AWS --password-stdin $ECR_SIMULATION_URI
You should see a message saying Login Succeeded
3. Tag the local Docker Image for the simulation to the repository URI
docker tag my_robot_simulation $ECR_SIMULATION_URI
4. Push the local Docker Image to the Amazon ECR for your account.
docker push $ECR_SIMULATION_URI
This will begin the process to push the Docker Image to ECR. Once the process is done, you can view and verify that the image has been uploaded to your account. Log into your AWS console and go to the Amazon ECR dashboard, and click on Repositories. You should see the new my_robot_simulation repository under Private repositories.

Running Docker Image on other machines
With the Docker Image stored in your Amazon ECR account, you can distribute and run the image on any Linux host provided that it has Docker Engine, NVIDIA Container Toolkit, and the AWS CLI installed (refer to the Installing Docker Engine section earlier). For this example, we will continue to use Docker Engine but from a different Ubuntu Linux host.
You will need to authenticate to the AWS account where the Image has been uploaded and registered to. The user or IAM must have the right permission to pull and run the image. Also, the repository URI from the publish steps above is needed to identify the Image to download. You can also get the URI from the AWS console.
1. Set the Repository URI and log into AWS
For convenience, set an environment variable to the URI for the Docker Image.
export ECR_SIMULATION_URI=000000000000.dkr.ecr.us-west-2.amazonaws.com/my_robot_simulation
Once logged into your AWS account using the same aws configure steps above, you can pull the Docker Image based on the repository URI. Then get the login password for your ECR and send it to the docker login
aws ecr get-login-password | docker login --username AWS --password-stdin $ECR_SIMULATION_URI
2. Pull the Docker Image
Pull the Docker Image from ECR to the local Docker Engine. This will make the Image ready to run.
docker pull $ECR_SIMULATION_URI:latest
Note: If this step is omitted, the first attempt to run the image will perform the pull operation anyways.
3. Launch the Docker Image
Once the Docker Image is pulled to your local Docker Engine, launch the image. We will be using the ROS2 environment embedded in the Docker Image, so instead of running the simulation directly, we will log into the Docker Image’s bash terminal with the following commands:
xhost +local:root

docker run --rm --gpus all -e DISPLAY=:1 -v /tmp/.X11-unix:/tmp/.X11-unix -it $ECR_SIMULATION_URI:latest /bin/bash
Once logged into the Docker Image, launch the simulation as a background process and redirect the output to a log file:
/data/workspace/Simulation/MyRobotSimulation.GameLauncher > simuation.log 2>&1 &
This will launch the simulation client in a new window on your host machine. Wait until the client initializes and shows the warehouse scene to ensure that the simulation has started, and run the following command to launch the rviz tool to connect.
ros2 launch /data/workspace/launch/navigation.launch.py
You will now be able to see the RViz client connected to the simulation.
Tearing Down
Once we are done with distributing the simulation, we can remove it from Amazon ECR. The cost that Amazon ECR incurs is based on the storage that is used by the Docker Image ($0.10 USD per GB/Month). The image constructed with this blog takes up about 1.7 GB of storage, which translates to about $0.17 USD per month. To delete the ECR image, log into your AWS console and navigate to the Amazon ECR dash board. Locate the my_robot_simulation under Private registry->Repositories. Select it and click the Delete button.
Conclusion
In this blog, we introduced a portable and consistent approach to distributing an O3DE simulation project to different machines. We took the sample robotic simulation project we created in a previous blog post and exported the simulation as a separate package. We used this exported package to build an OCI compliant container image using Docker Engine and published it to a container registry using Amazon ECR. Finally, we demonstrated how to pull and run the simulation Docker Image using Docker Engine and NVIDIA container toolkit.
Keep up to date with O3DE:
- Learn more by visiting the website
- Join Discord to ask questions and share your insight or projects with other developers
- Connect with the Open 3D Foundation community on LinkedIn
- Watch tutorials on the Open 3D Engine YouTube Channel
- Subscribe to the new quarterly newsletter
