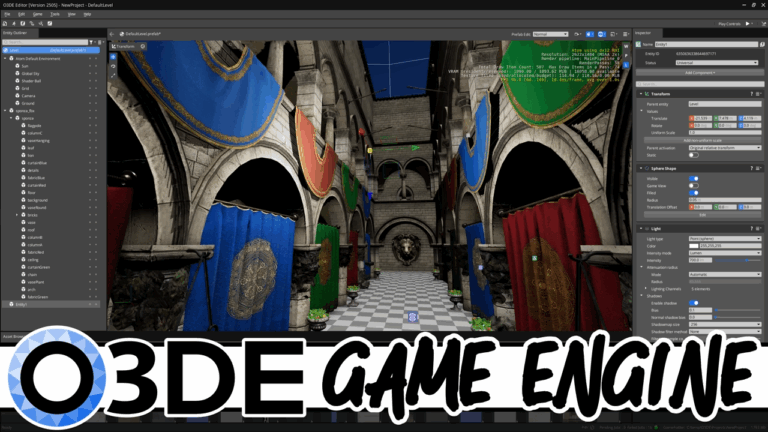

How to add realism to your game with the Physics Grab gem
One of the things that makes video games so unique is interactivity. Unlike books or movies, games let you step into a world and influence the environment, like moving things around, solving problems, and interacting with objects.
Grabbing a crate to solve a puzzle, hurling a barrel at an enemy, or fiddling with objects just for the fun of it makes your game feel alive and responsive. You can take this even further by using physics to interact with objects in a truly realistic way.
With the Physics Grab Gem in O3DE you can do exactly that.
Unlike many common grab systems that simply move objects by updating their transforms (which can feel stiff and lifeless), this gem applies real physics forces like impulses and velocities to objects for dynamic interactions that feel genuinely responsive. This free, open-source gem will enable:
- Physics-Based Grabbing: Pick up, hold, move, and rotate objects with real physics forces for natural, responsive interactions.
- Dynamic Motion: Spring-like, bouncy behavior using a PID controller that makes even heavy objects feel weighty and realistic.
- Off-Center Interaction: Grab objects offset from the center of mass, letting them tilt and rotate naturally for immersive realism.
- Chargeable Throws: Charge and release throws to allow controlled distance and speed.
…And much more!
Let’s dive in and set up the Physics Grab in O3DE!
Step 1: Install and Enable the Physics Grab Gem
First, make sure you have O3DE and Git installed.
- Go to the Physics Grab Gem’s GitHub page.
- Click the green Code button and copy the repository URL.
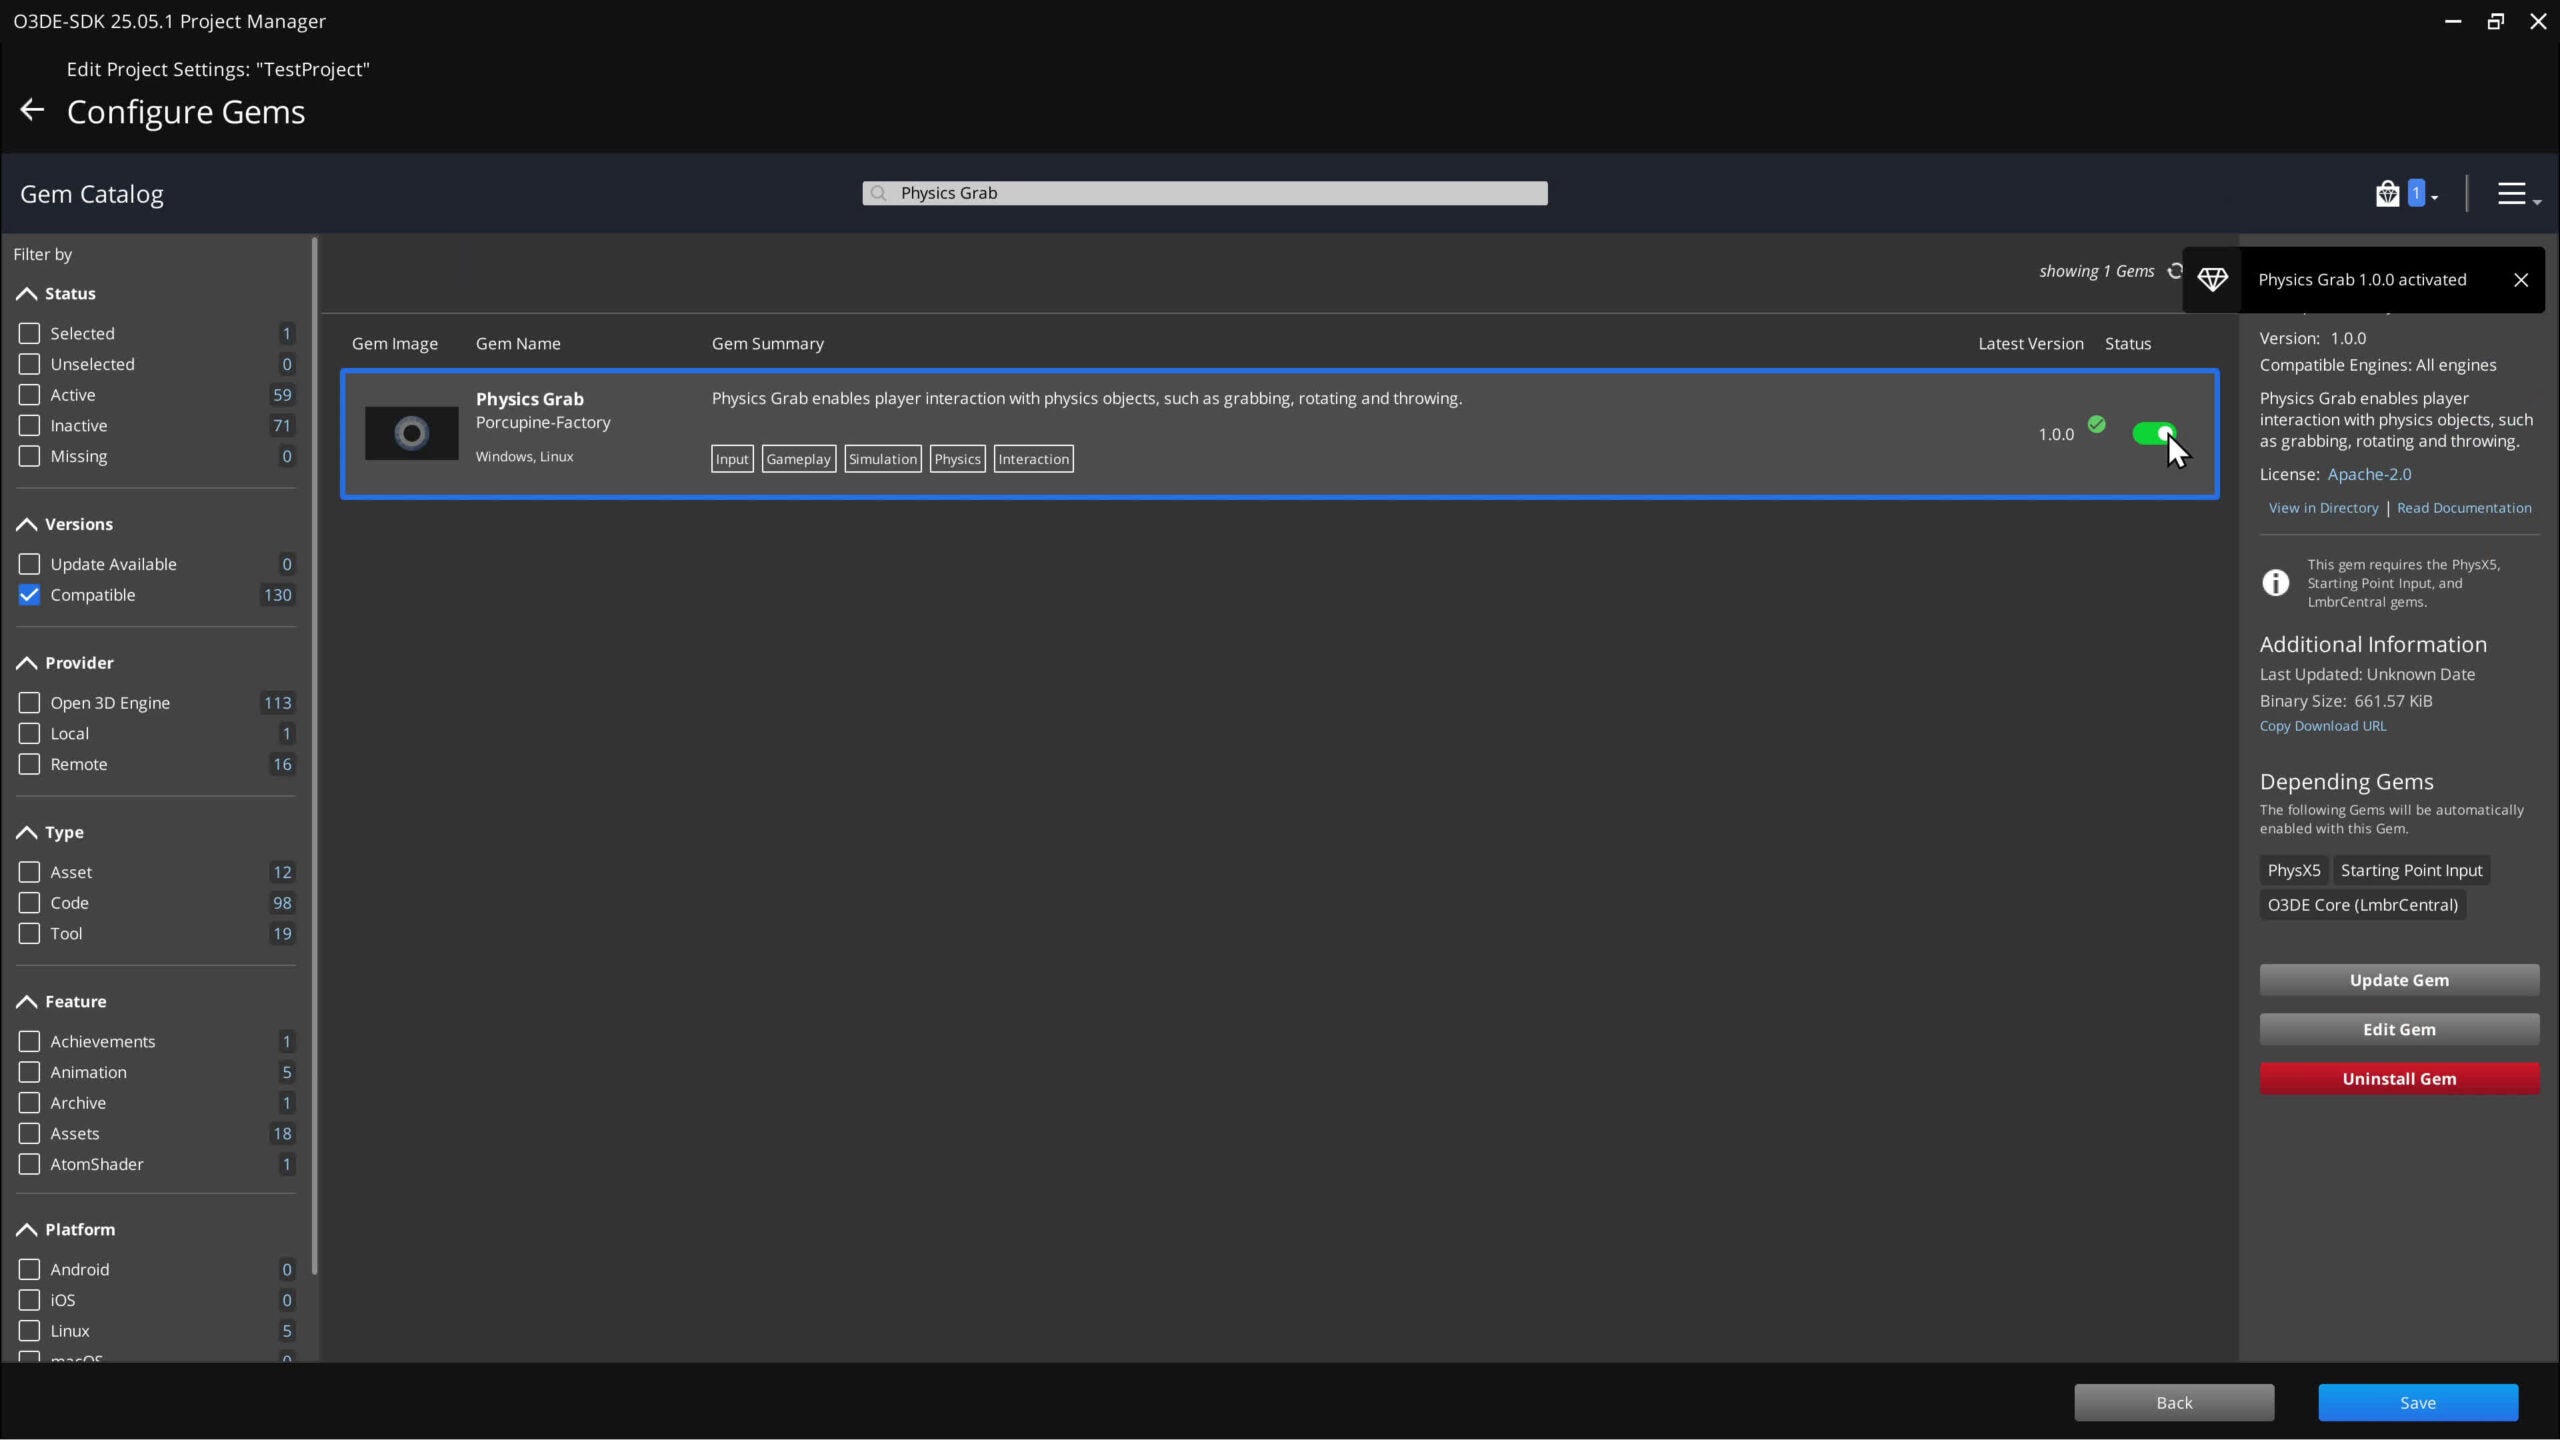
- Open O3DE’s Project Manager and go to the Gems tab.
- In the top-right corner, click the hamburger menu → Show Gem Repos → Add Repository.
- Paste the copied GitHub link and click Add.
Now we need to enable the Physics Grab gem for your project.
- Go back to the Projects tab.
- Click the menu icon under your project and select Configure Gems.
- Search for “Physics Grab,” toggle it on, and click Save.
- If you see a popup asking to install PhysX5, Starting Point Input, LmbrCentral, and Atom API gems, make sure those are installed (PhysX5 must be enabled, not PhysX4).
- Rebuild your project and open the editor.
You’ll need to decide which entity will handle the grabbing. This gem is designed mainly for a first-person controller and camera setup. It works in third-person too, but first-person feels best since it ties into camera rotations.
If you already have a first-person controller and camera entity set up, you’re good to go. If not, free to use our First Person Controller gem.
We need a player character entity to start using the Physics Grab component:
- If you don’t already have one, create a Player Character entity in the Entity Outliner.
- Select your player character, click “add component” in the entity inspector, search for Physics Grab Component, then select it.
- If you get a missing component warning, click Add Required Component and select the Input Component.
Step 2: Configure Input Bindings
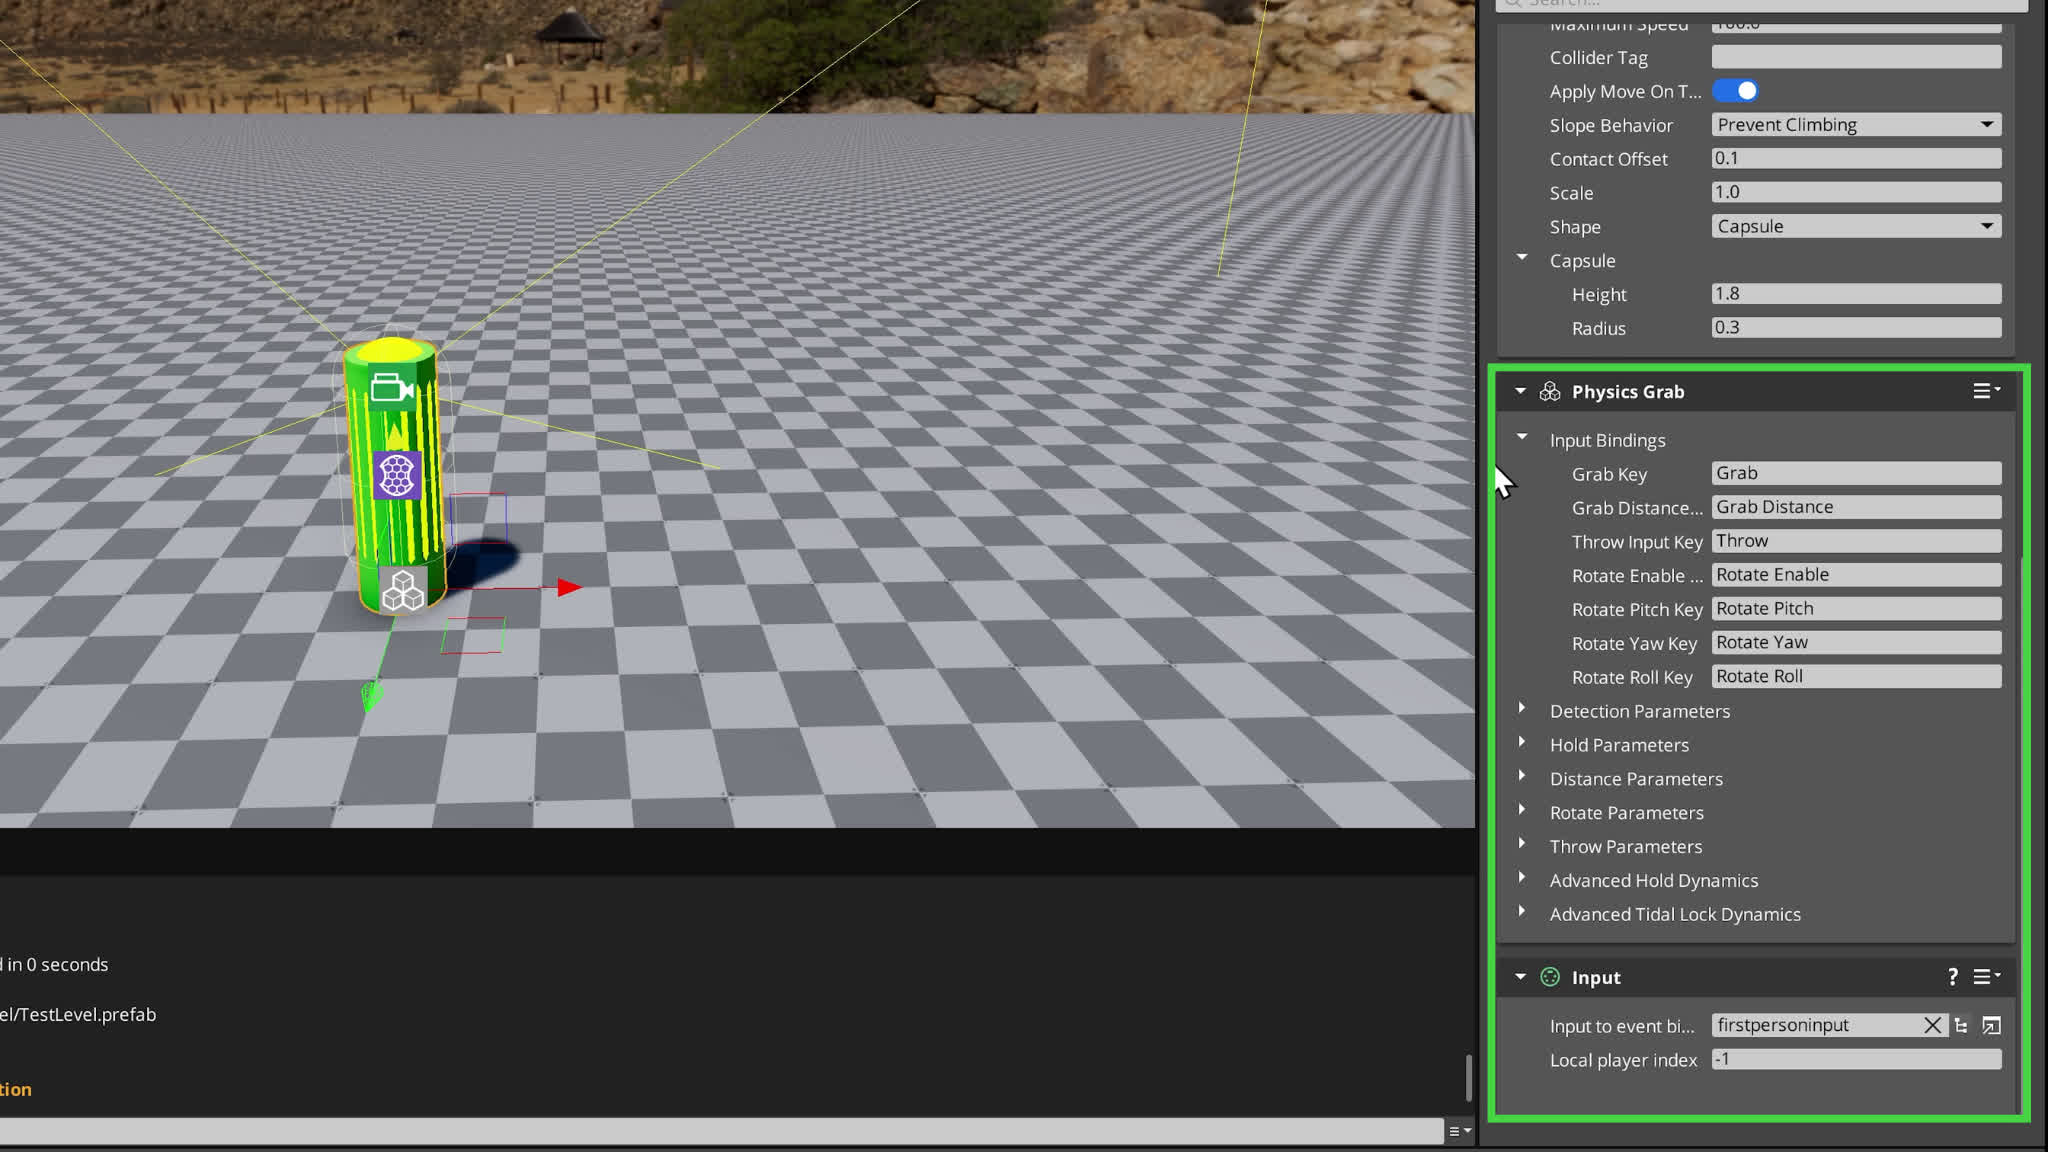
Next, we’ll set up inputs so the player can grab, rotate, and throw objects. In the Physics Grab component, expand “Input Configuration”. You’ll see default strings like “Grab” (for picking up), “Throw,” “Rotate,” etc. We’ll need to set most of these up in the Asset Editor. For this tutorial, we’ll leave out Rotate Roll.
- Open the Asset Editor (Tools → Asset Editor).
- Open or create a new Input Binding file.
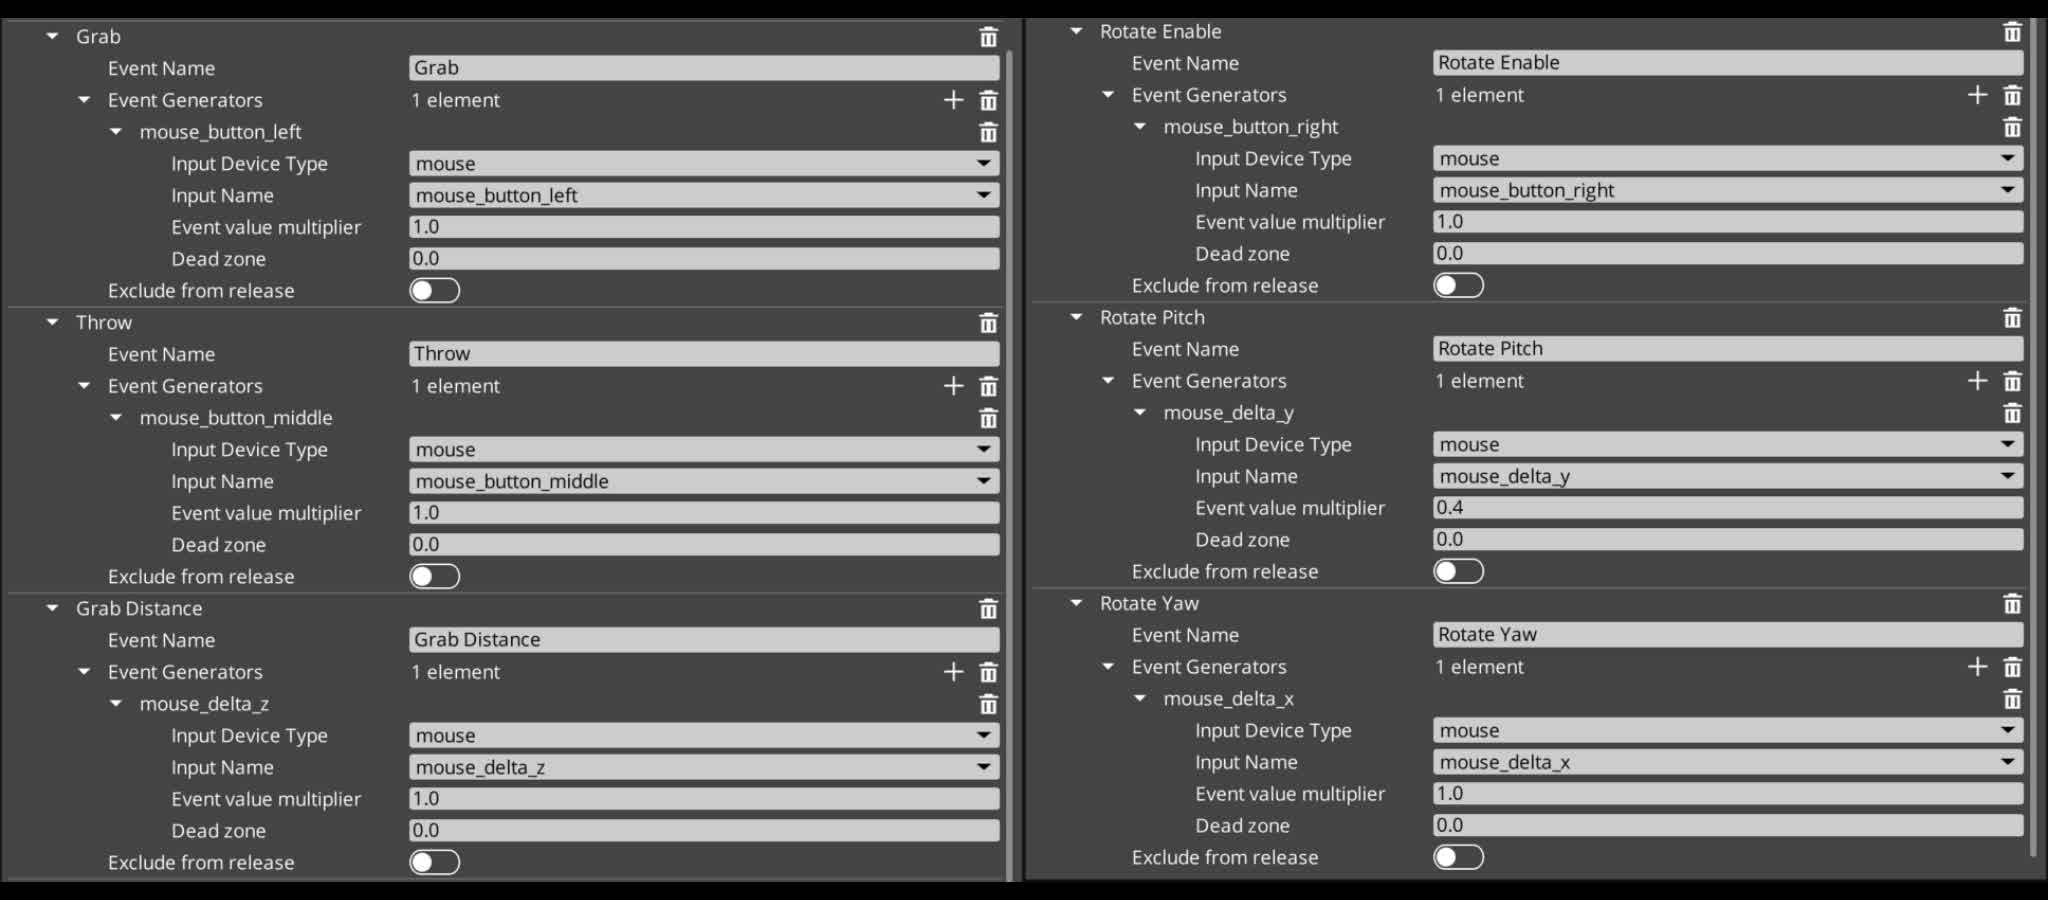
- Create new Input Event Groups the following input events:
- Grab (rec. mouse_button_left)
- Rotate Enable (rec. mouse_button_right)
- Rotate Pitch (rec. mouse_delta_y)
- Rotate Yaw (mouse_delta_x)
- Throw (rec. mouse_button_middle)
- Grab distance (rec. mouse_delta_z)
Make sure the Event Names match what’s in the Physics Grab component (e.g. “Grab” for the grab key). When you’re finished, make sure to save the file in the Asset Editor.
 Now let’s go back to the Entity Outliner.
- Select your Player Character entity.
- In the Input component, assign the new input binding file you just created. (You can skip this step if you updated an existing input binding file).
- Save your project.
Step 3: Create a Grabbable Object
We need something to test grabbing with! Let’s make a physics-enabled box.
- Create a new entity called Physics Box.
- Add a Mesh Component to this entity, then click the folder icon and search for the “_Box_1x1.fbx” model.
- In the Physics Box’s Transform Component, next to Translate, set Y = 3.0m and Z = 0.5m.
- Add a PhysX Dynamic Rigid Body component.
- Add a PhysX Primitive Collider component.
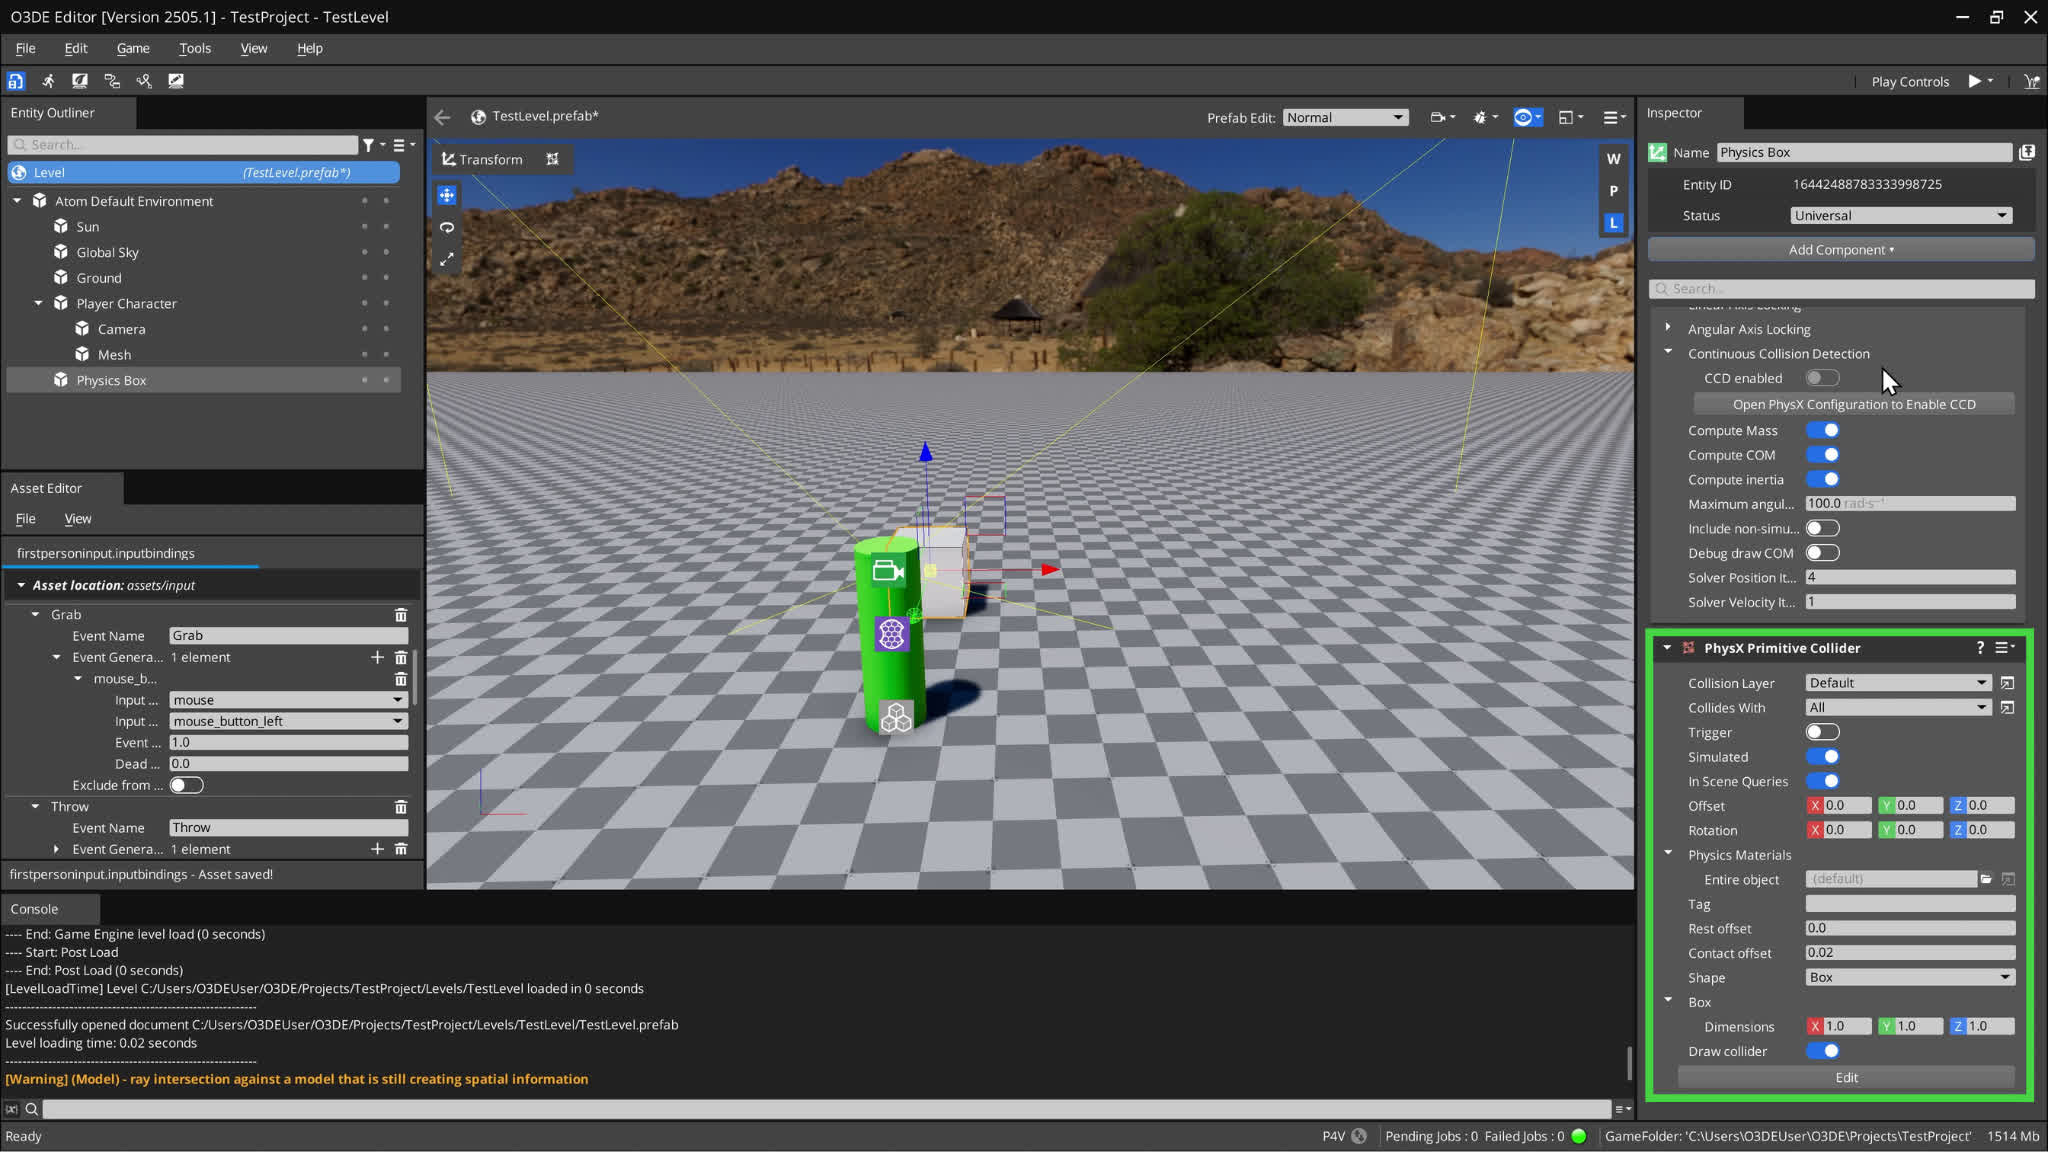 Now the Physics Box entity is set up as a simulated object that reacts dynamically to physics forces.
Step 4: Set Up Collision Filtering
The Physics Grab Gem uses collision layers and groups so it knows which objects can be grabbed. We need to set these up so our player character can interact with our Physics Box.
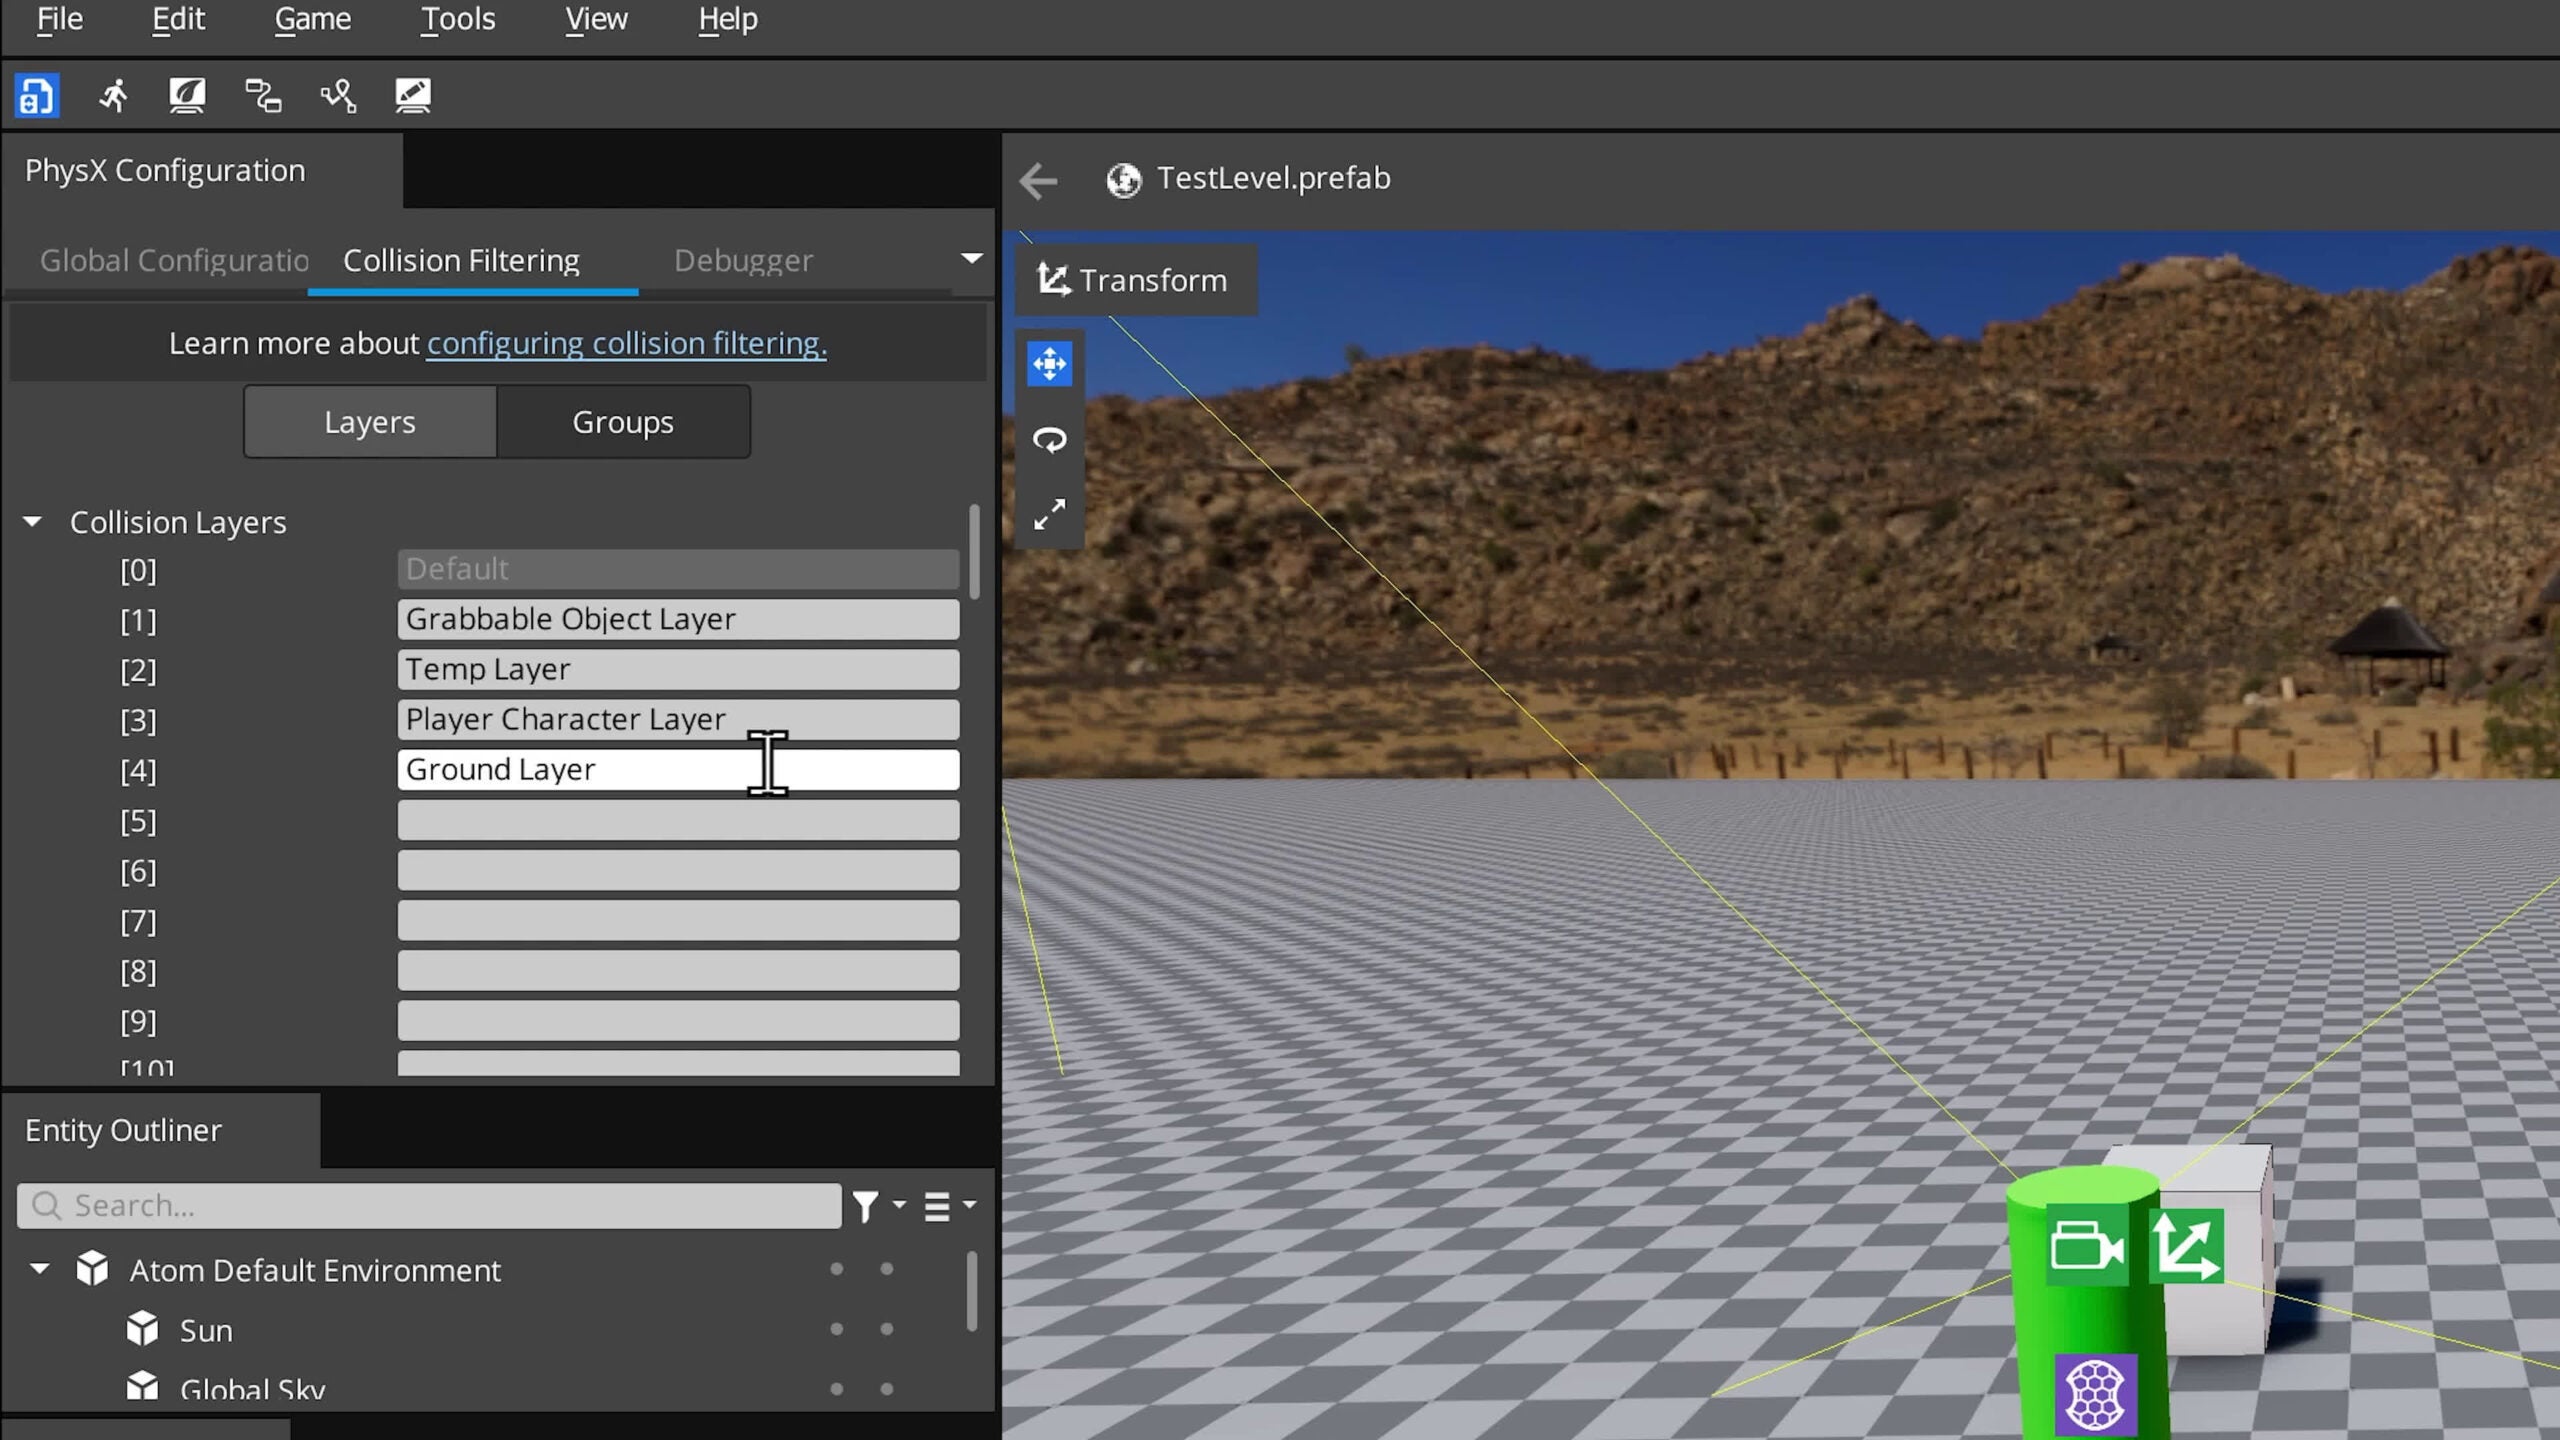
- Open PhysX Configuration (Tools → PhysX Configuration).
- In the Collision Filtering tab, create the following new layers:
- Grabbable Objects Layer
- Temp Layer
- Player Character Layer
- Ground Layer
- Create Collision Groups:
- Grabbable Objects Group
- Uncheck every box except Grabbable Objects Layer and Temp Layer
- Player Character Group
- Uncheck every box except Grabbable Objects Layer and Ground
- Grabbable Objects Group
 Now let’s go back to the Physics Box Entity. We’ll need to and assign these new layers/groups.
- Physics Box Entity
- PhysX Primitive Collider → Collision Layer → Grabbable Objects Layer
- PhysX Primitive Collider → Collides With → All
- Ground Entity
- PhysX Primitive Collider → Collision Layer → Ground Layer
- PhysX Primitive Collider → Collides With → All
- Player Character Entity
- PhysX Character Controller → Collision Layer → Player Character Layer
- PhysX Character Controller → Collides With → All
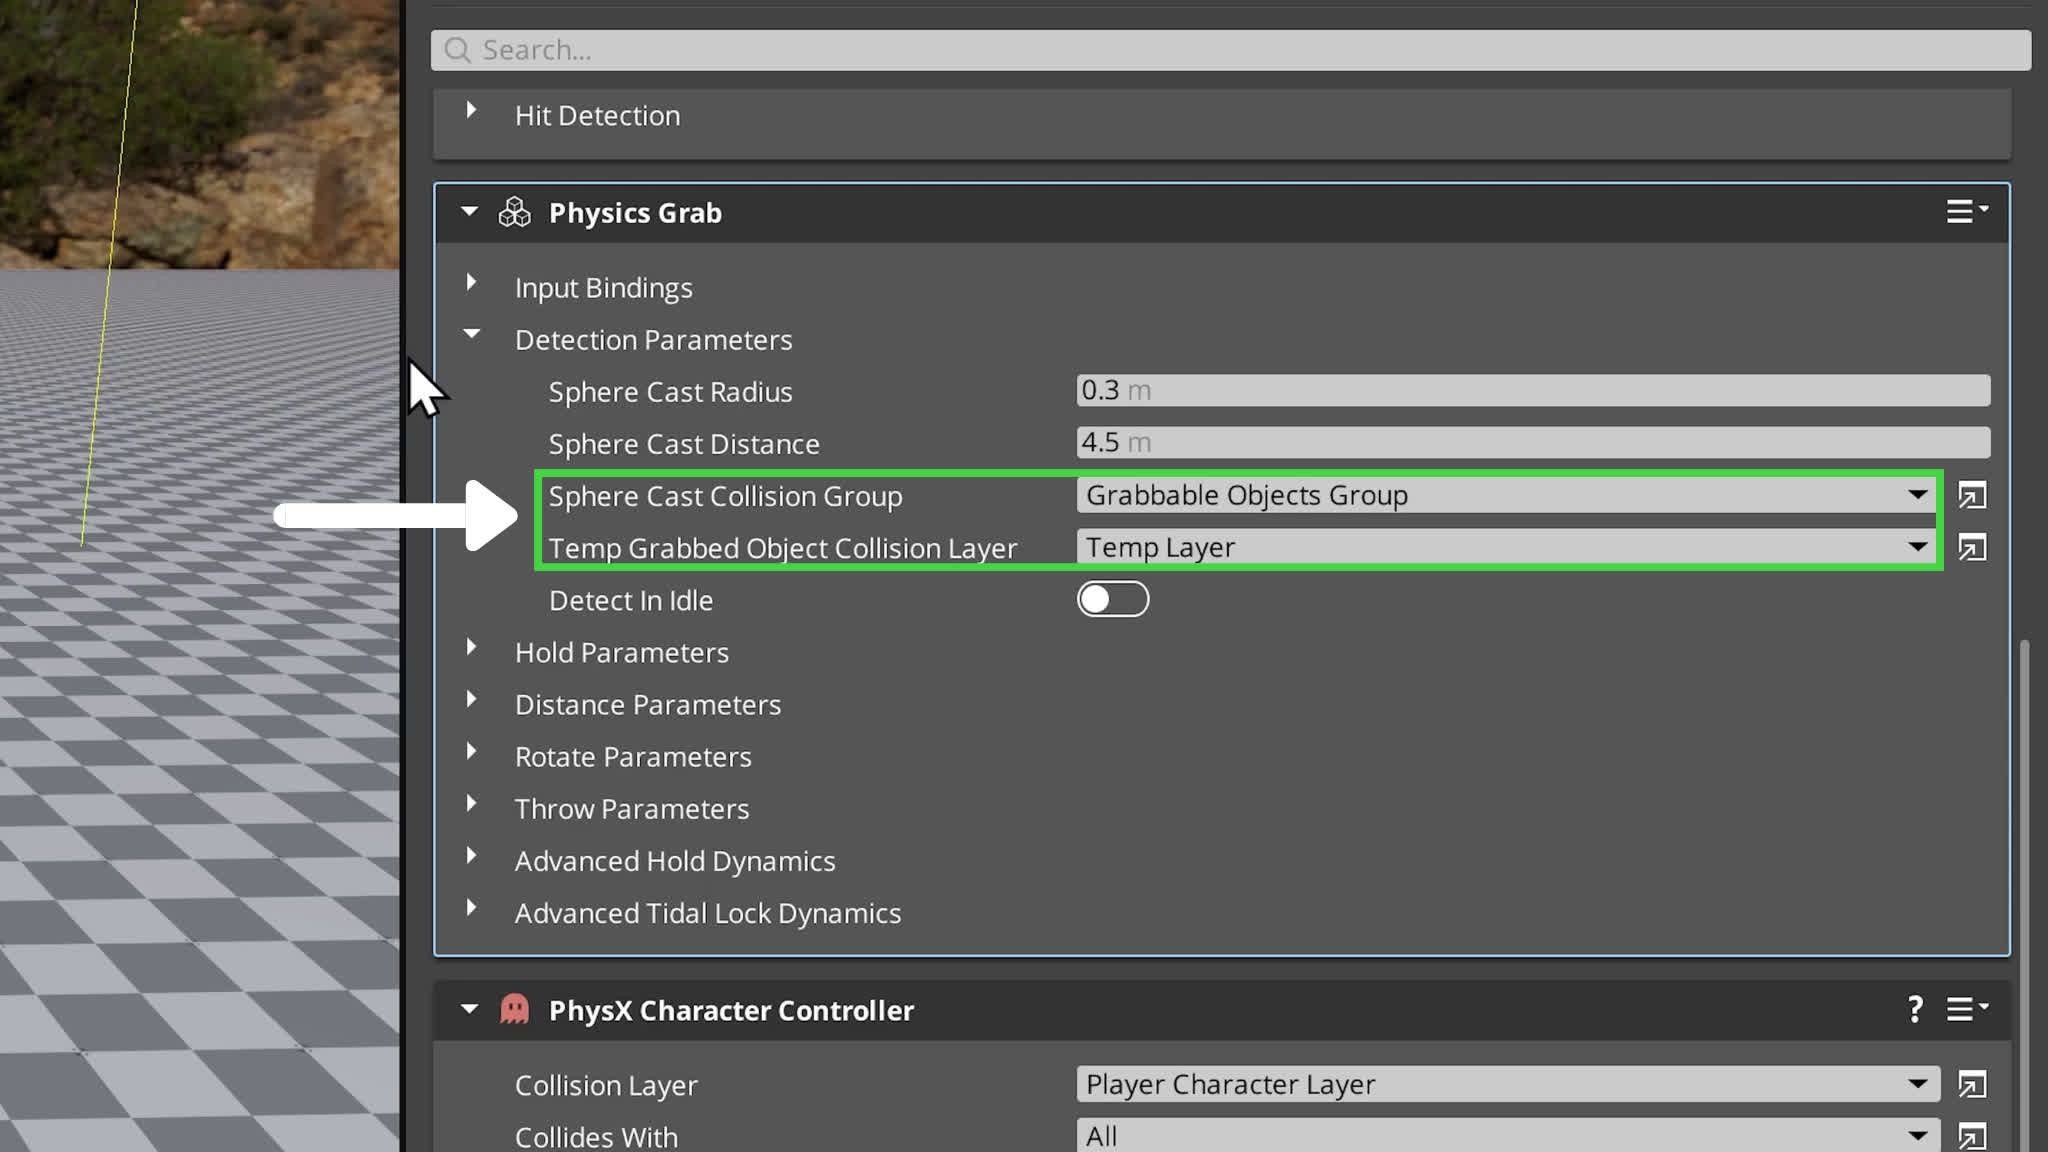
- Physics Grab Component → Detection Parameters → Sphere Cast Collision Group → Grabbable Objects Group
- Physics Grab Component → Detection Parameters → Temp Grabbed Object Collision Layer → Temp Layer
- First Person Controller (if you are using it) → Grounded Collision Group → Player Character Group
 Note: if you don’t see the newly created collision layers/groups in your component’s drop-down lists, you may need to refresh the list by temporarily selecting a random layer/group.
And if you’re using the First Person Controller component, in the Jumping section, set the Grounded Collision group to Player Character Group.
That’s it for collision filtering! Now let’s save the project.
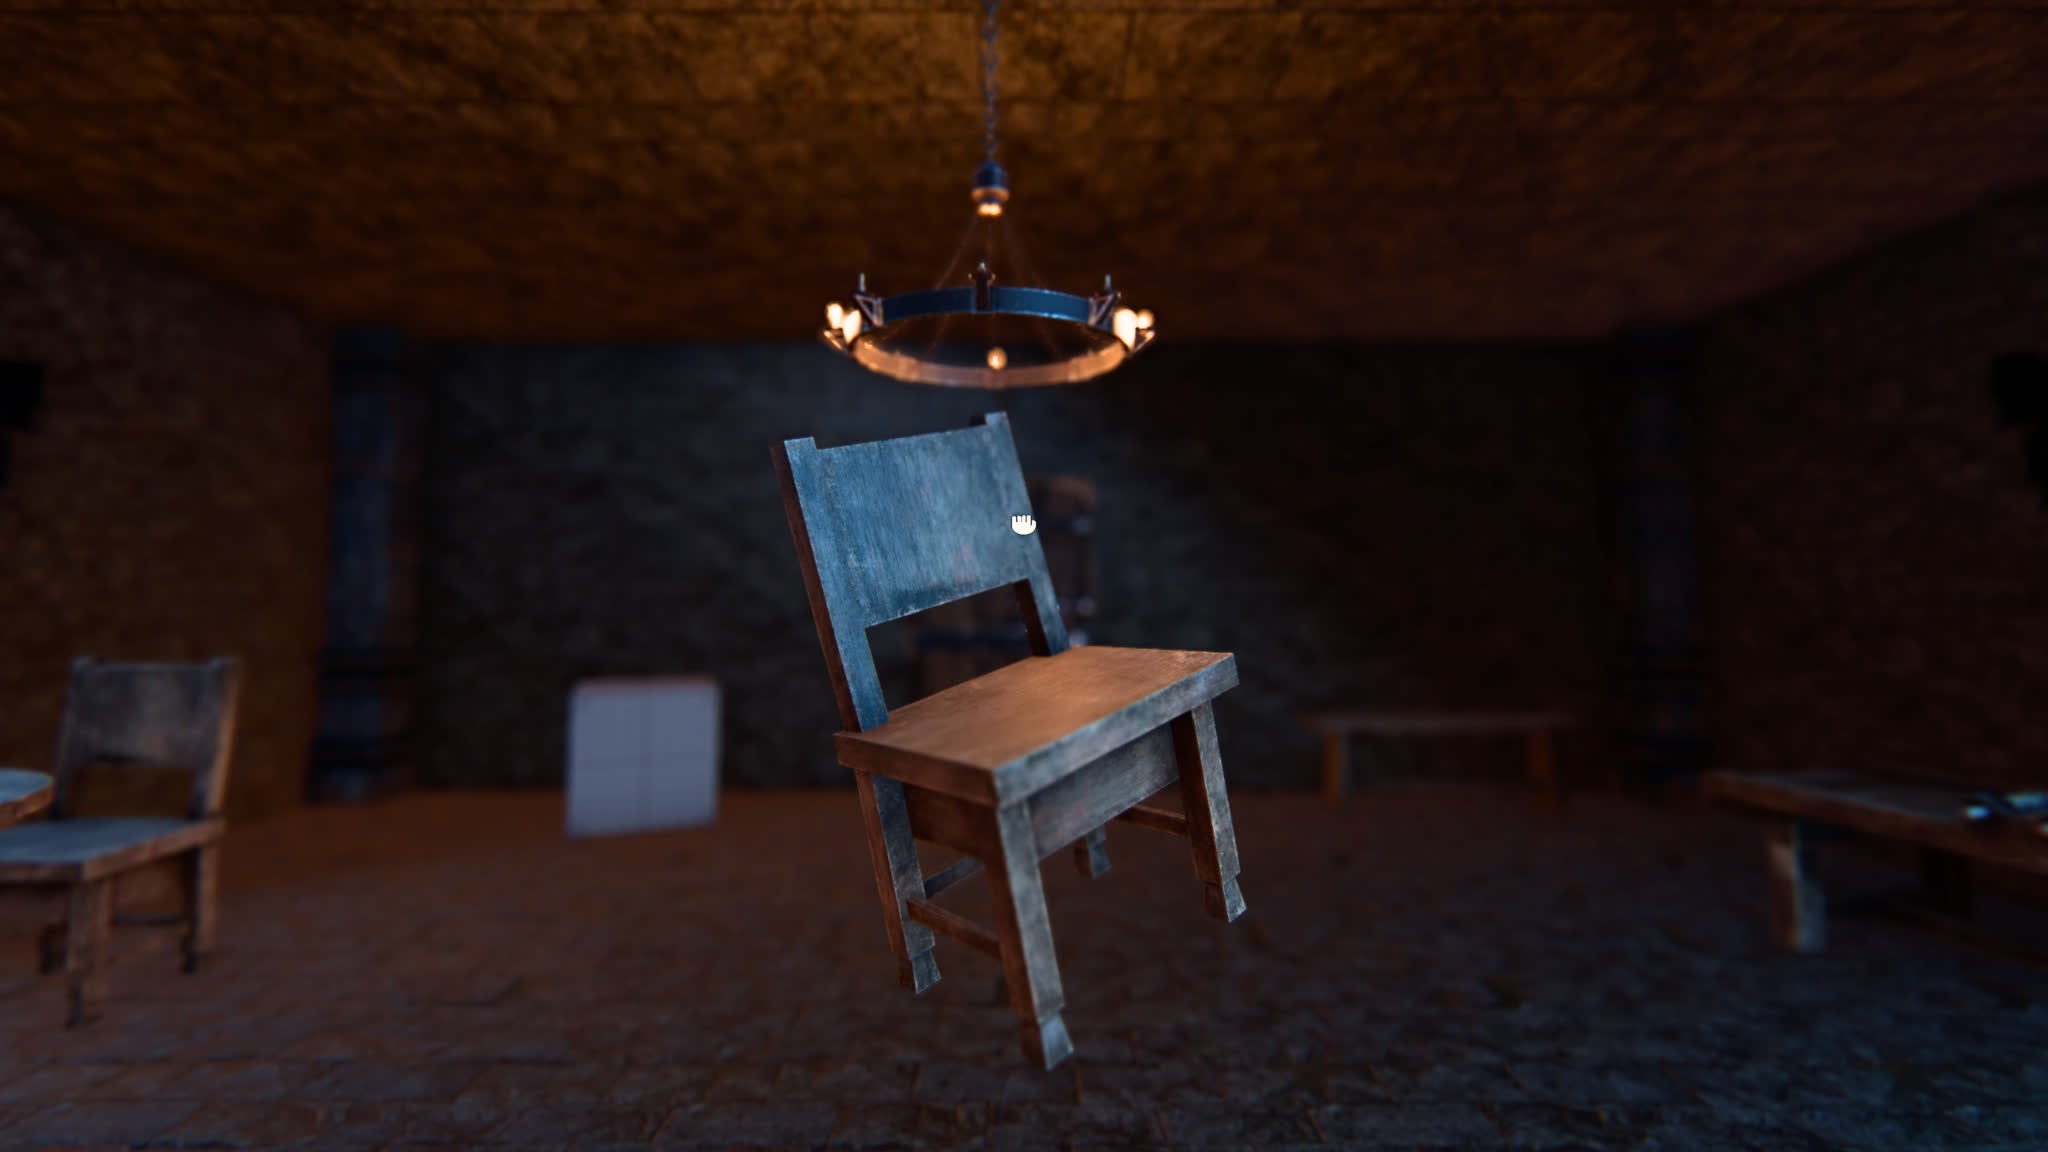
Step 5: Test Your Grab System
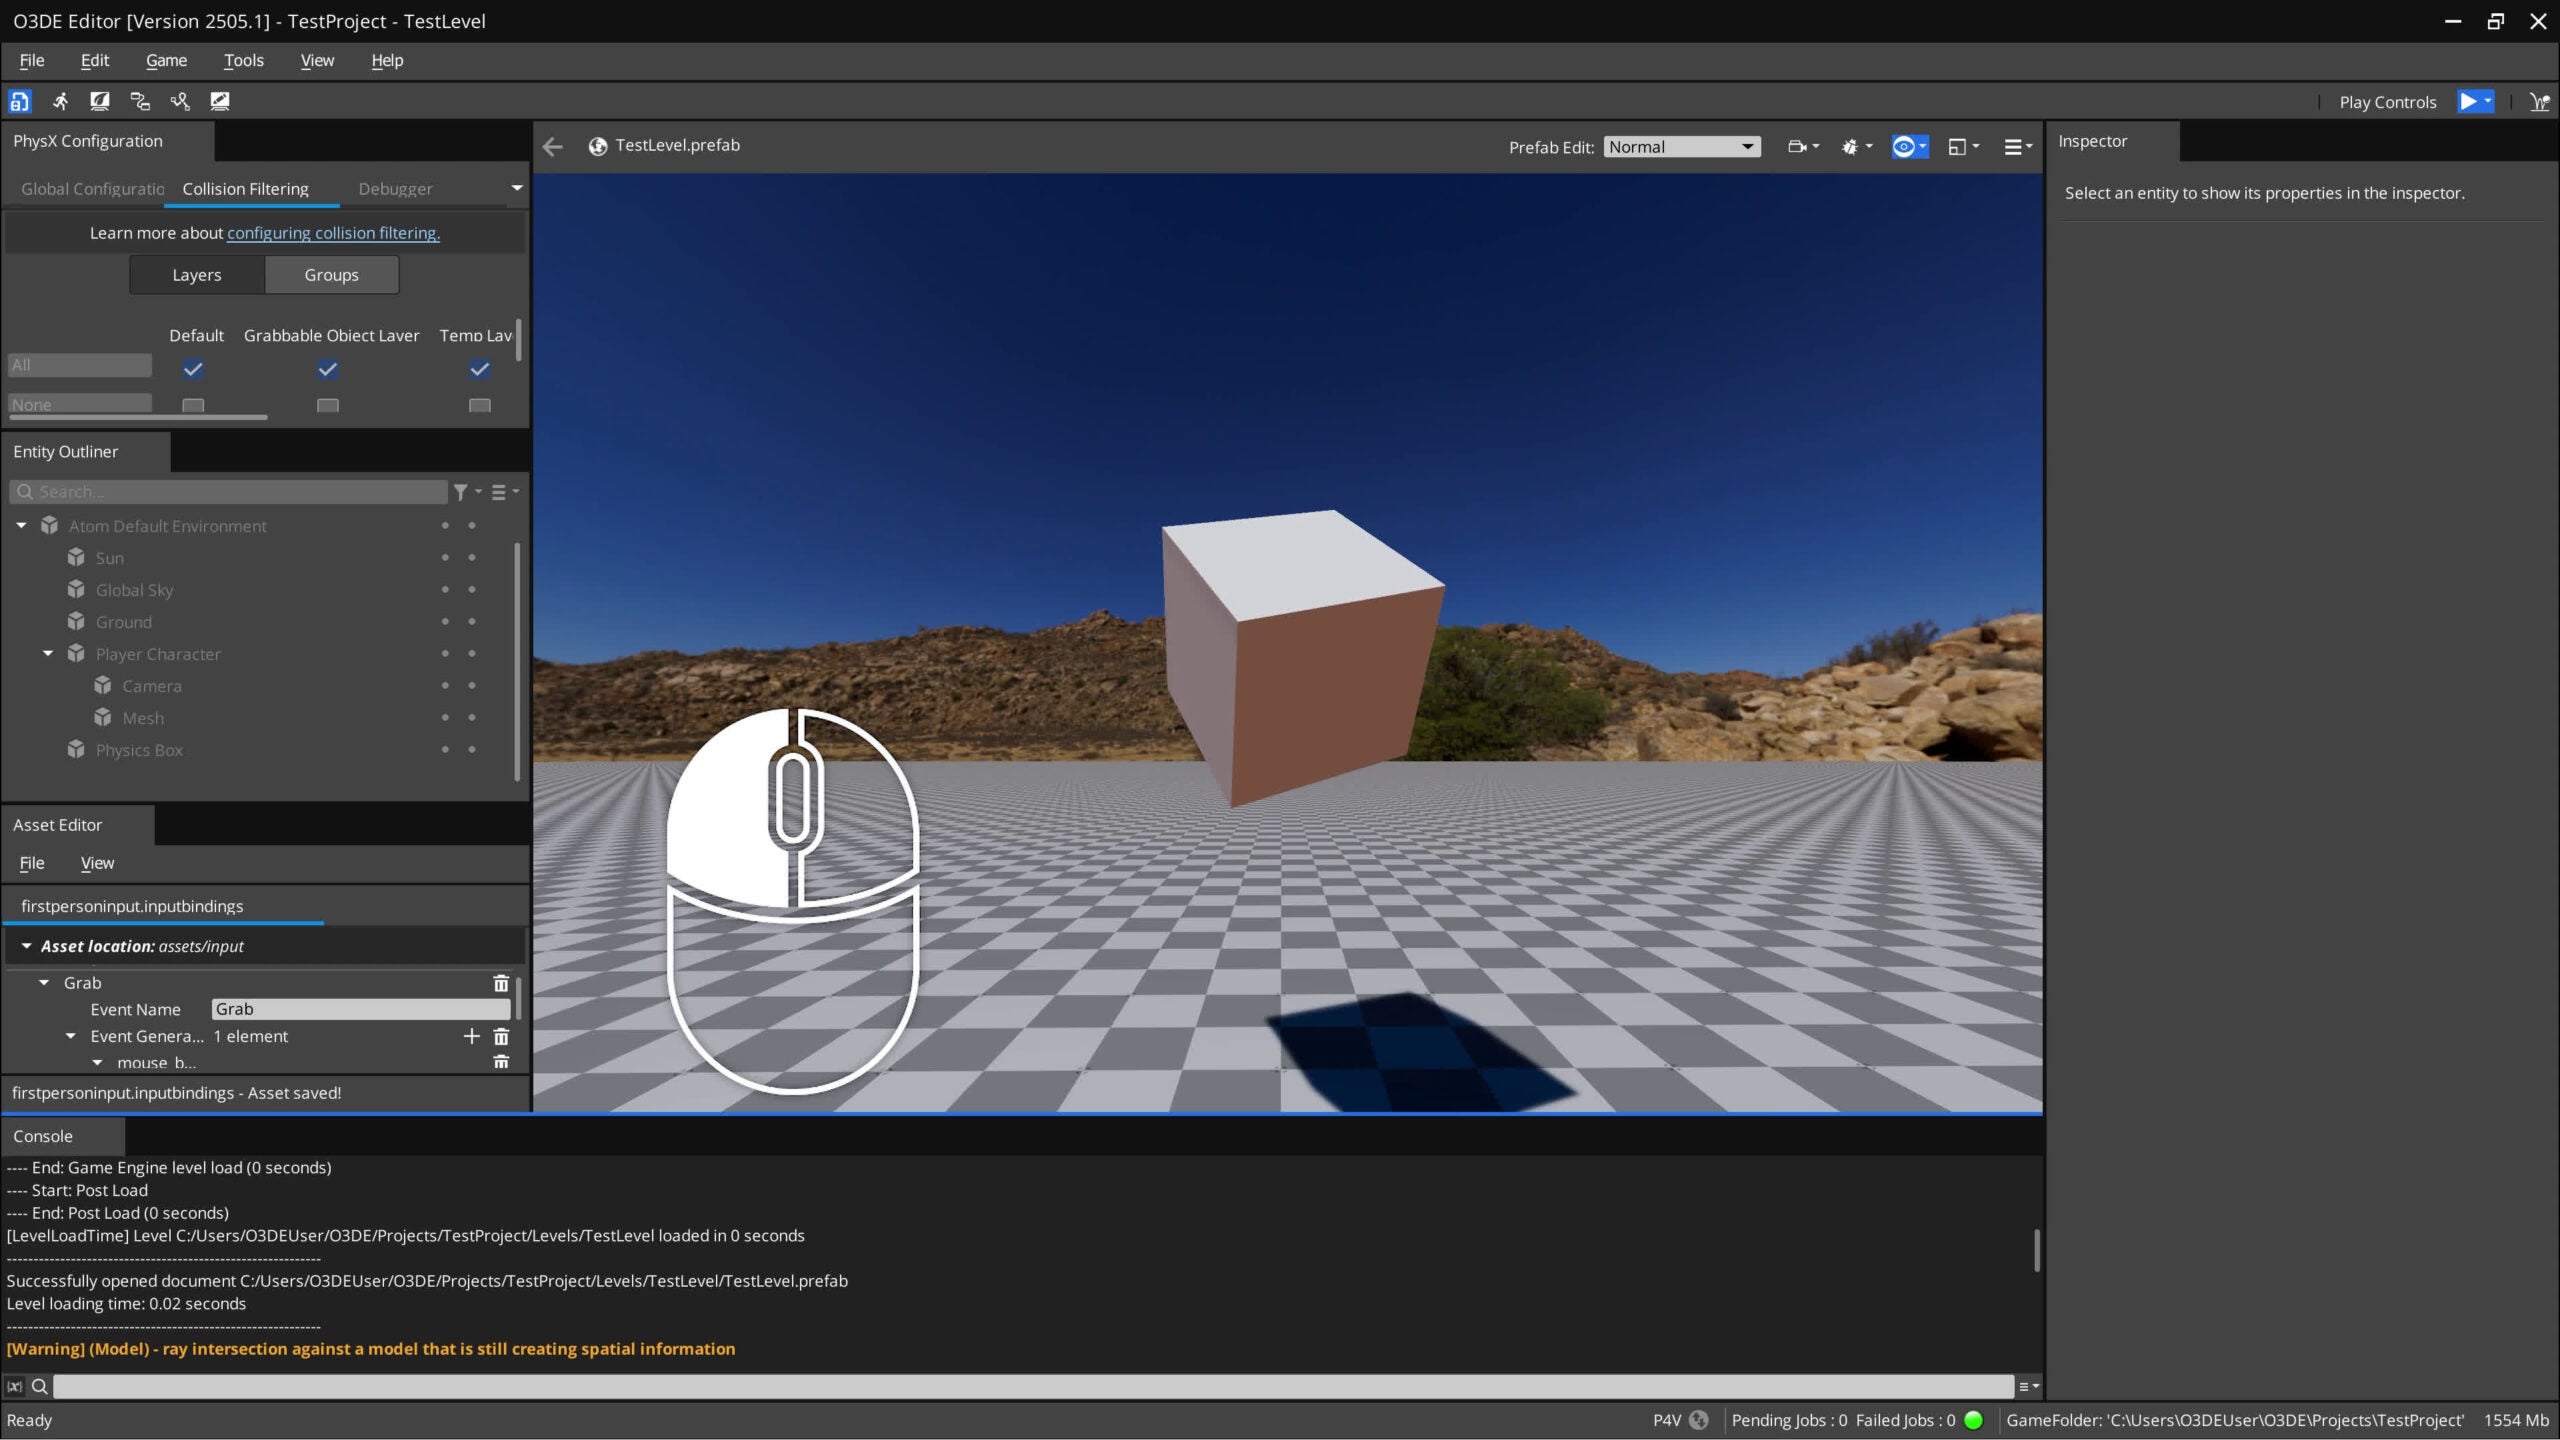 Enter game mode (Ctrl+G) and press your grab key. You should be able to pick up the box, move it around, rotate it, and throw it.
If it doesn’t work, double-check:
- Collision layers/groups are set correctly.
- Input bindings match the Physics Grab component names.
Step 6: Customizing the Physics Grab Component
Now we can fully customize the physics grab component to enable features like offset grab, chargeable throw, grab toggle, or adjust the rotation sensitivity. Below we’ll learn about each parameter and what they do.
Input Bindings
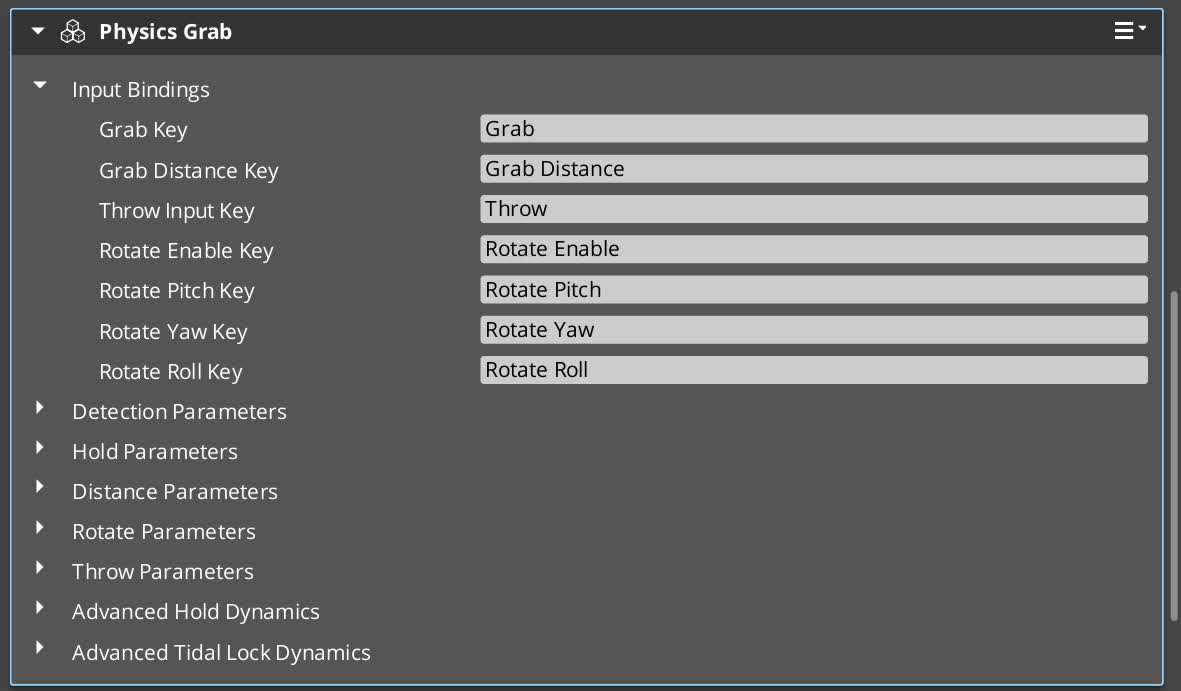
- Here you can specify the string names for the input bindings. You will need to use these string names when setting up Input Events in the Asset Editor.
Detection Parameters
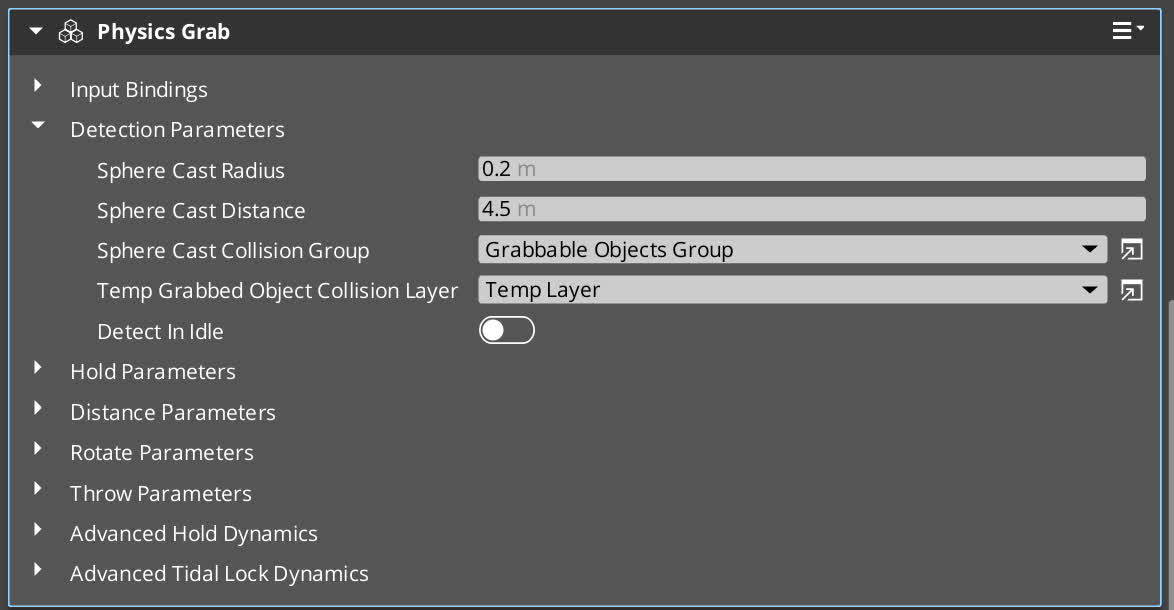
- Sphere Cast Radius: The size of the radius you want for object detection. A bigger radius means a larger grab area.
- Sphere Cast Distance: How far you want to be able to detect objects (higher = farther grabs).
- Detect In Idle: Performs the spherecast in the idle state. This lets you check for grabbable objects before pressing the grab key.
- Sphere Cast Collision Group: Collision group for detecting grabbable objects via sphere cast. Only objects in this group can be grabbed.
- Temp Grabbed Object Collision Layer: Temporary collision layer that the object switches to while the object is being held. This temporary layer helps prevent situations like jumping on held objects (which basically allows your character to fly).
Hold Parameters
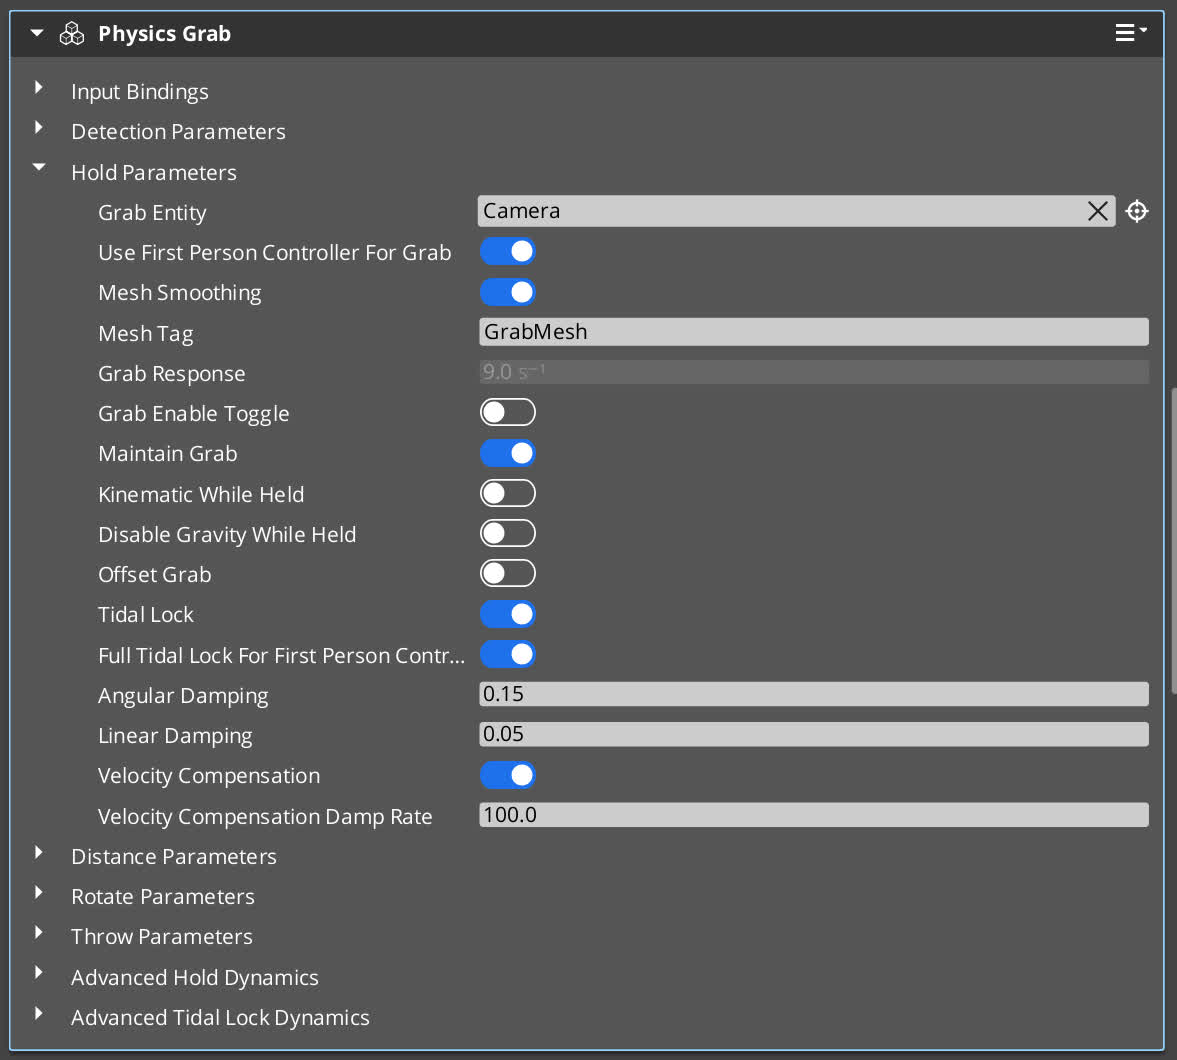
- Grab Entity: Entity that does the grabbing. Defaults to the Active Camera if left empty.
- Use First Person Controller For Grab: Entity that does the grabbing. Defaults to the Active Camera if left empty.
- Mesh Smoothing: Reduces jitter when fixed timestep and render framerate are out of sync. If your fixed timestep is slower than your fps, and you try to move your object around, you might notice the object stutter and snap to locations.
- To enable this, move the Physics Box mesh component to a child entity, add a Tag component, and name GrabMesh (or whatever string specified in Mesh Tag field).
- Mesh Tag: String name used for child entity used in Mesh Smoothing.
- Grab Response: The strength of your Grab. This adjusts how quickly objects follow your movement (higher = quicker snap to position, more rigid feel). Used when PID disabled.
- Toggle Grab: Toggles grab on press (enable for click-to-hold; disable to require holding key).
- Maintain Grab: Keeps holding objects even if sphere cast misses (enable to prevent drops during fast turns).
- Kinematic While Held: Makes held object kinematic (no physics simulation; enable for stable holding, disable for dynamic interactions and collisions)
- Disable Gravity While Held: Turns off gravity for dynamic held objects (enable for weightless feel; disable for natural sag under gravity). Only noticeable if PID enabled.
- Offset Grab: Applies force at hit point for dynamic objects (enable for realistic tilt/rotation; disable to use center-of-mass).
- Tidal Lock: Locks object rotation to face grab entity (enable for consistent orientation; disable for free spin during hold).
- Full Tidal Lock For First Person Controller: Uses full camera rotation for tidal lock when using First Person Controller Component (enable for head-tracking lock; disable for body yaw only). This parameter is only visible if both Use First Person Controller Component and Tidal Lock are enabled.
- Angular Damping: Damps angular motion while held/rotated (higher = less wobble/spin; low = more natural rotation decay).
- Linear Damping: Damps linear motion while held (higher = quicker stop, less drift; low = more momentum preservation).
- Velocity Compensation: Adjusts object distance for velocity changes in grabbing entity. Enabling this will keep grab distance the same whether you are walking, sprinting, or standing still.
- Velocity Compensation Damp Rate: Smoothing rate for velocity adjustment (higher = quicker adaptation to speed changes, less lag).
Distance Parameters
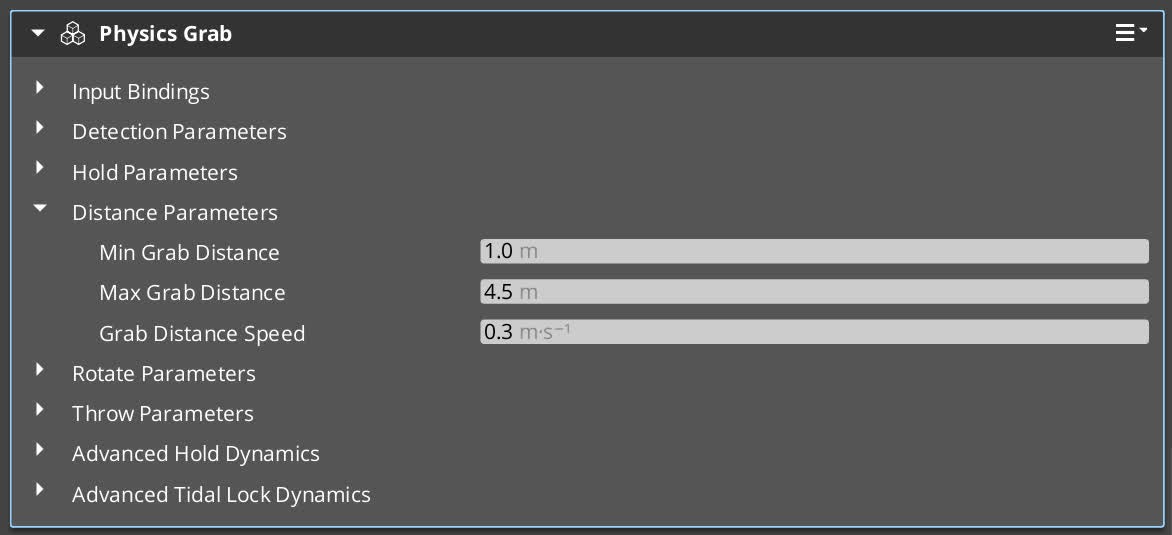
- Min Grab Distance: Closest allowable hold distance (higher = prevents clipping into entity; too high limits close inspection).
- Max Grab Distance: Farthest allowable hold distance (higher = more reach; too high may feel unstable at distance).
- Grab Distance Speed: Speed of distance adjustment (higher = quicker push/pull; balance for smooth control without jerk).
Rotation Parameters
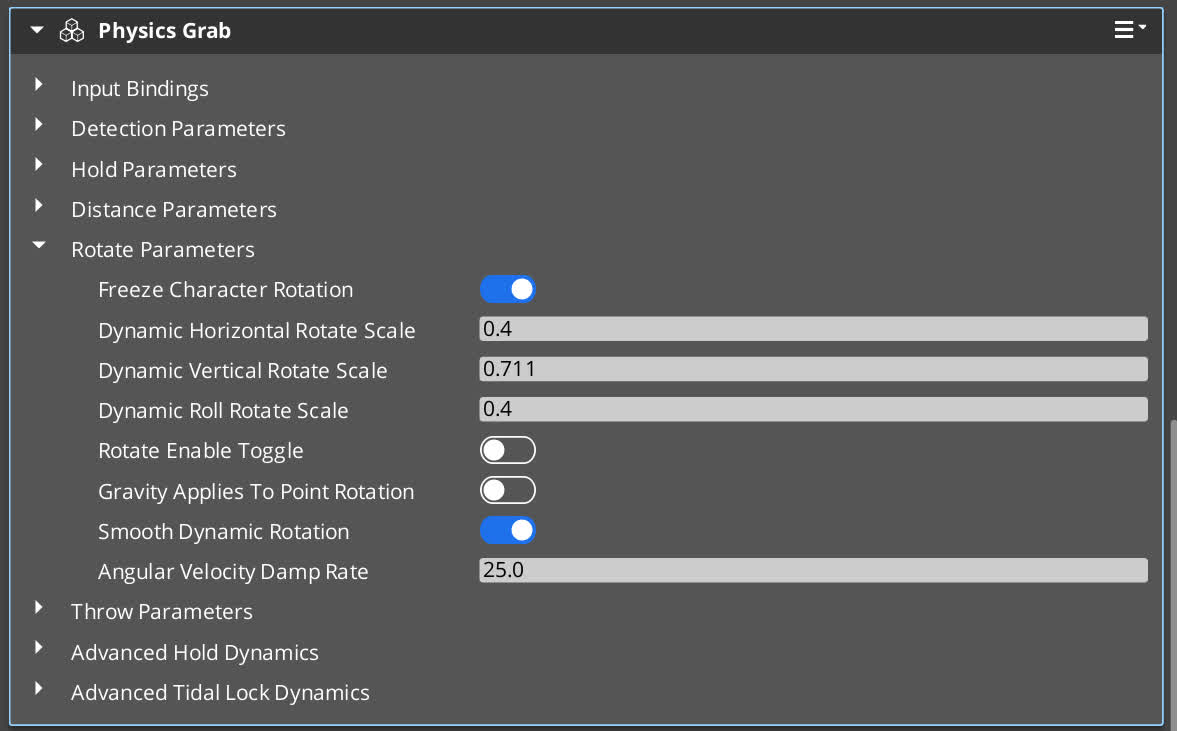
- Freeze Character Rotation: Locks FPC rotation during rotate mode (enable to focus on object; disable for simultaneous movement).
- Dynamic Rotate Scale (Horizontal/Vertical/Roll): Closest allowable hold distance (higher = prevents clipping into entity; too high limits close inspection).
- Kinematic Horizontal Rotate Scale (Horizontal/Vertical/Roll): Farthest allowable hold distance (higher = more reach; too high may feel unstable at distance).
- Rotate Enable Toggle: Toggles rotate mode on press (enable for click-to-rotate; disable to require holding for mode).
- Gravity Applies To Point Rotation: Allows gravity at offset point during rotation (enable for natural droop; disable for uniform behavior). Requires Offset Grab and PID Tidal Lock.
- Smooth Dynamic Rotation: Gradually applies angular velocity for dynamic objects in rotate mode (enable for fluid turns; disable for instant response).
- Angular Velocity Damp Rate: Smoothing rate for rotation buildup (higher = faster ramp-up, more responsive; low = gradual acceleration).
Throw Parameters
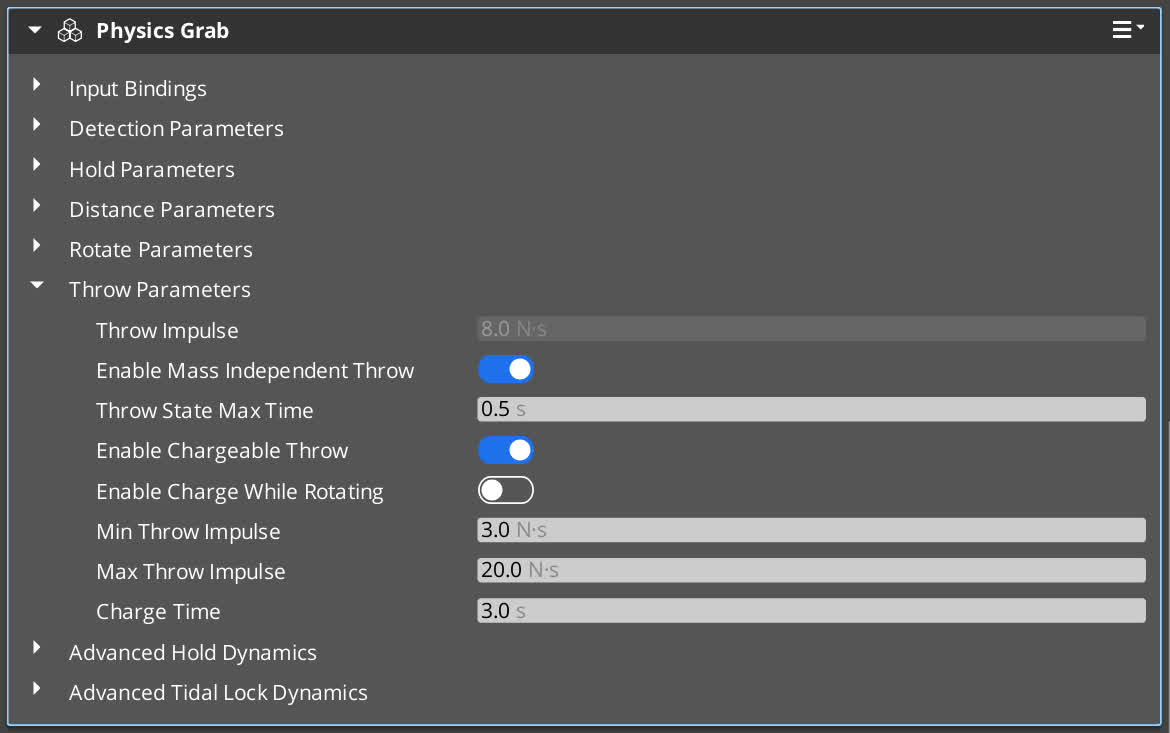
- Throw Impulse: Base throw strength for non-charged throws (higher = farther/faster throws; scales velocity if mass-independent).
- Enable Mass Independent Throw: Scales throw strength by mass for consistent velocity (enable for uniform throws; disable for heavier objects to throw shorter/slower).
- Throw State Max Time: Cooldown after throw before next grab (higher = longer wait, prevents instant re-grab).
- Enable Chargeable Throw: Allows holding throw key to build power (enable for variable strength; disable for fixed impulse throws).
- Enable Charge While Rotating: Permits charging during rotation mode.
- Min Throw Impulse: Lowest strength for instant throws (higher = stronger quick throws; sets charge start point).
- Max Throw Impulse: Highest strength after full charge (higher = more powerful max throws; sets charge ceiling).
- Charge Time: Duration to reach max impulse (higher = slower charge buildup, more control over strength).
Step 7: Advanced Parameters
For extra realism, you can enable PID Held Dynamics or PID Tidal Lock Dynamics. These parameters utilize PID controllers to create spring-like, responsive motion. A PID controller is a feedback loop that uses these three terms together to determine how to adjust the object’s position based on the “error”, the error being the difference between where the object is and where it should be.
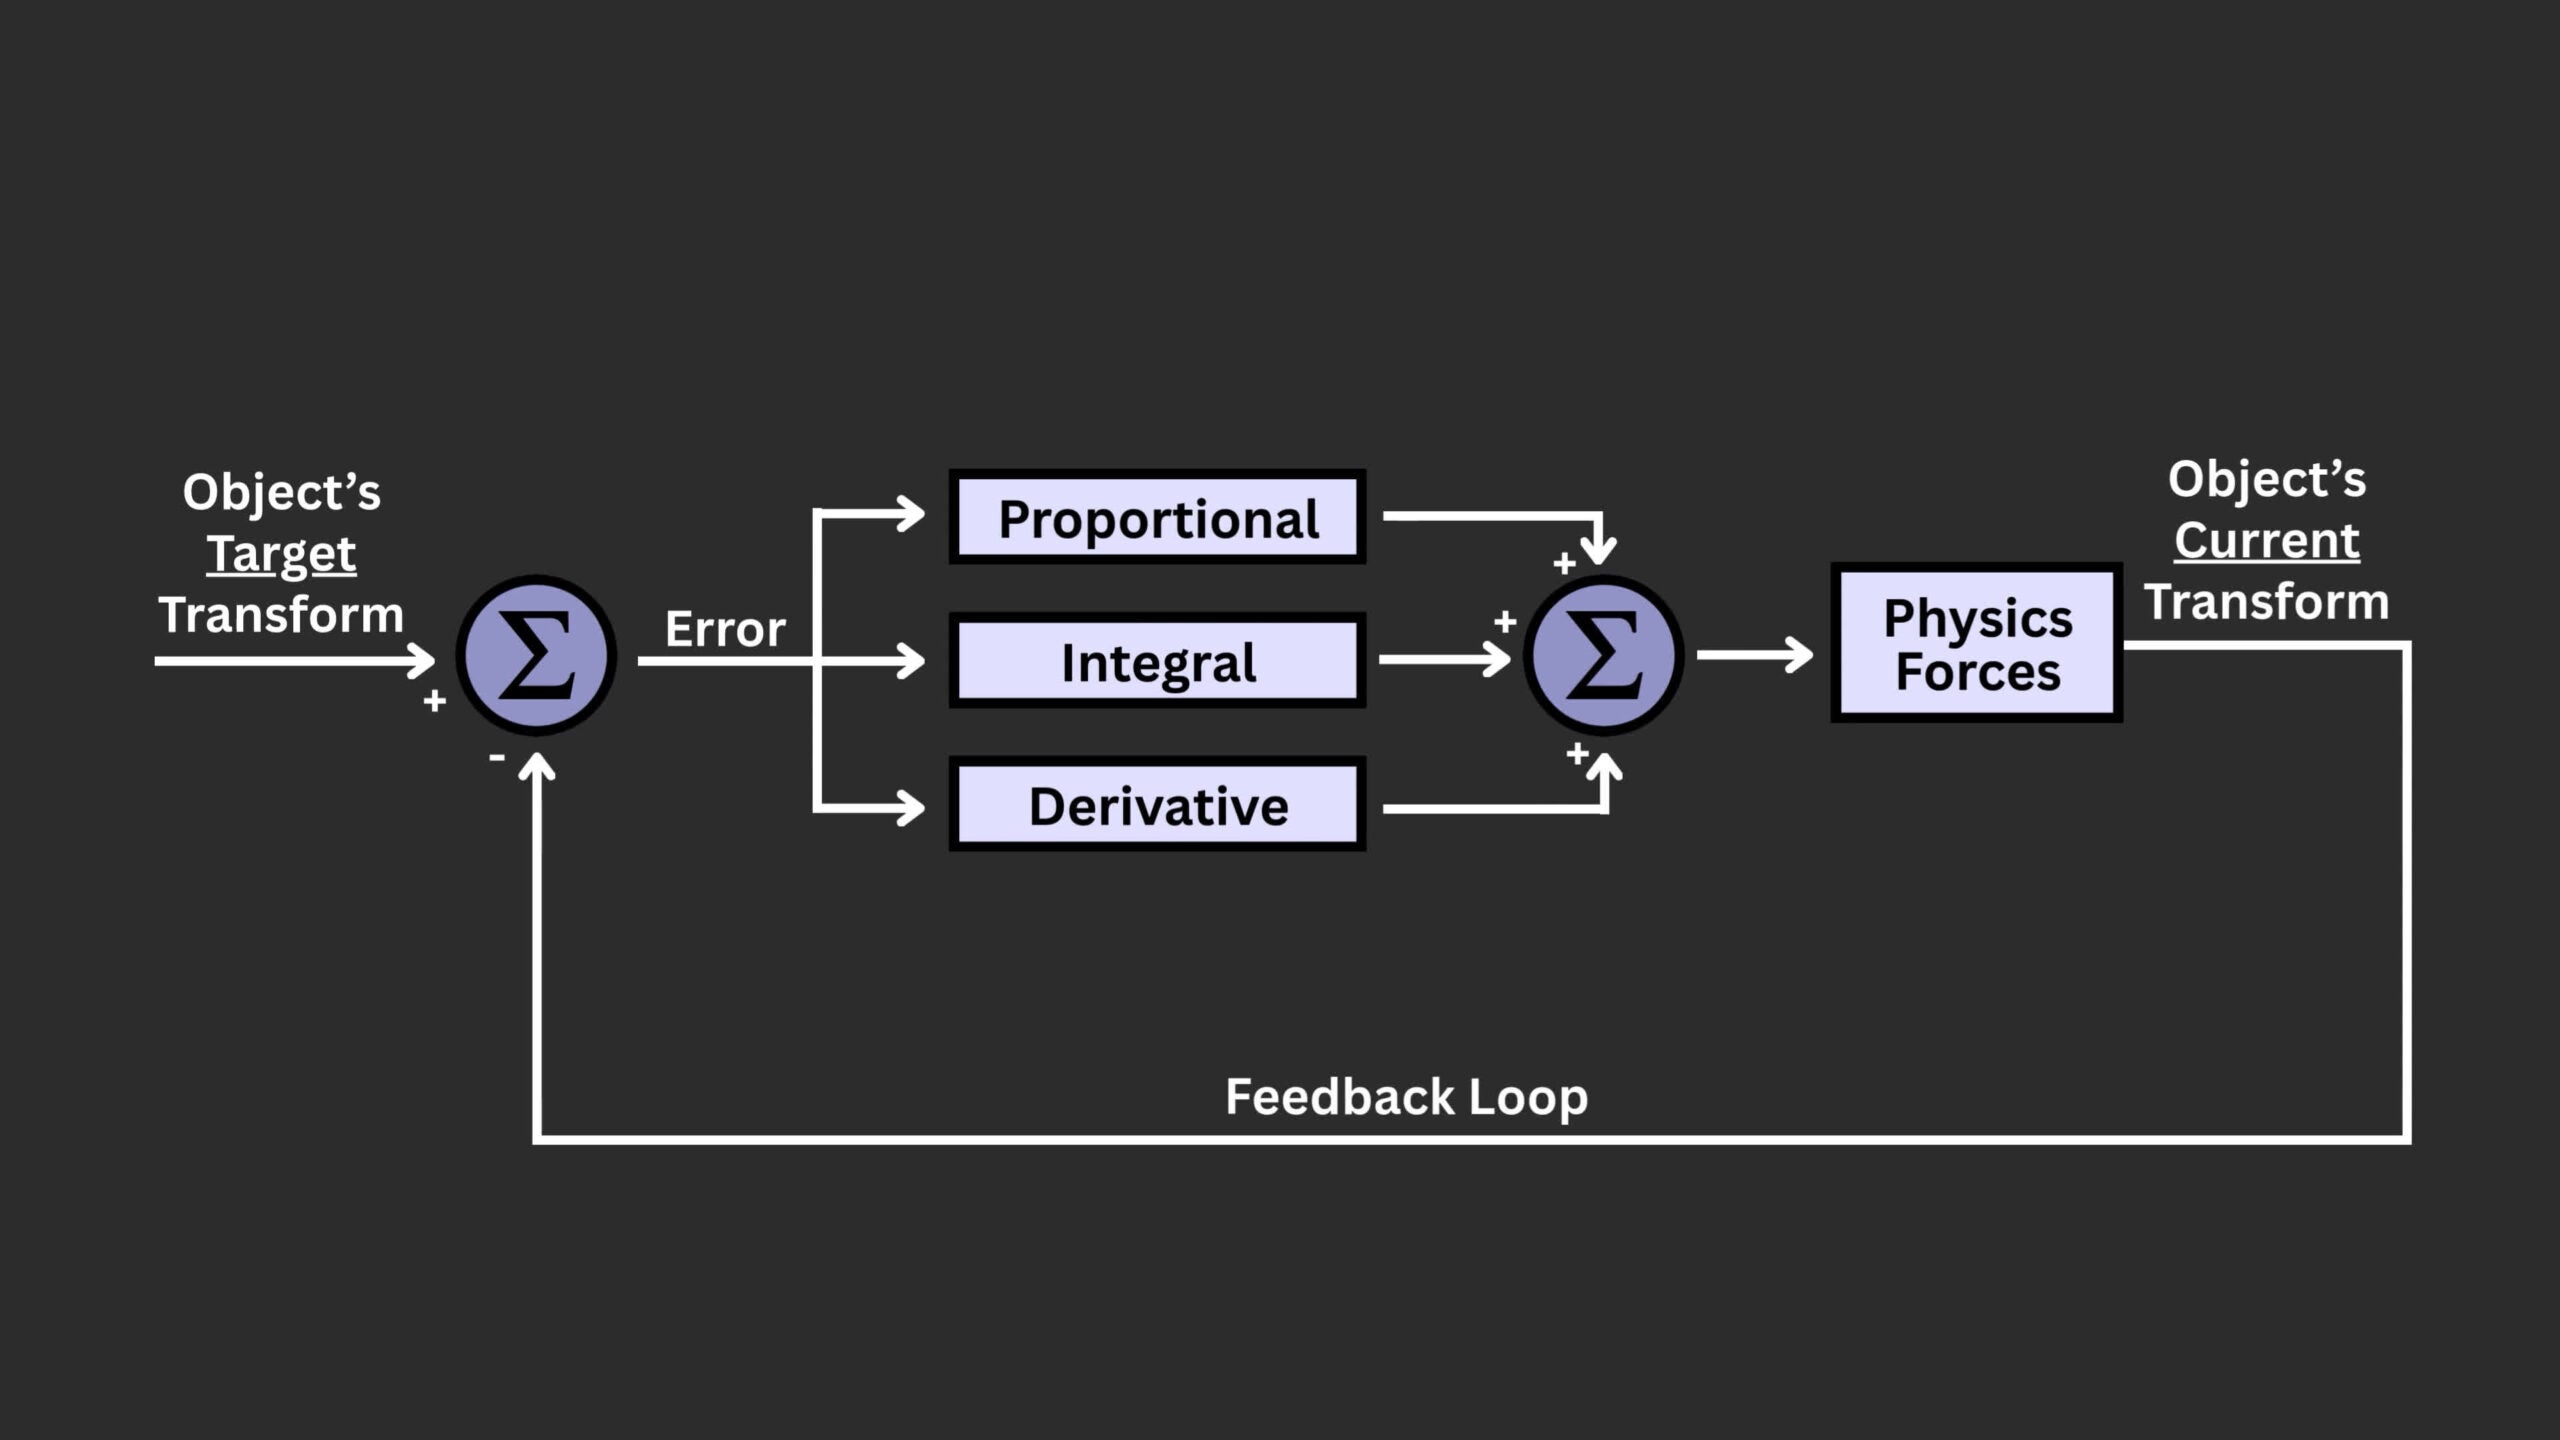 The Proportional (P) term reacts to the current error. Bigger error means stronger correction. The Integral (I) accumulates past errors to fix steady offsets (like gravity pulling down). And the Derivative (D) predicts future errors by looking at the error’s rate of change, adding damping to prevent overshoot.
If you think of it like driving: “P” steers you back to the lane when you’re off. “I” adjusts for a constant wind pushing you sideways. And “D” eases off the wheel to avoid swerving too hard. Together, they create smooth, responsive control.
Green Arrow = Proportional Force, Magenta Arrow = Integral Force, and Red Arrow = Derivative Force
Advanced Hold Dynamics
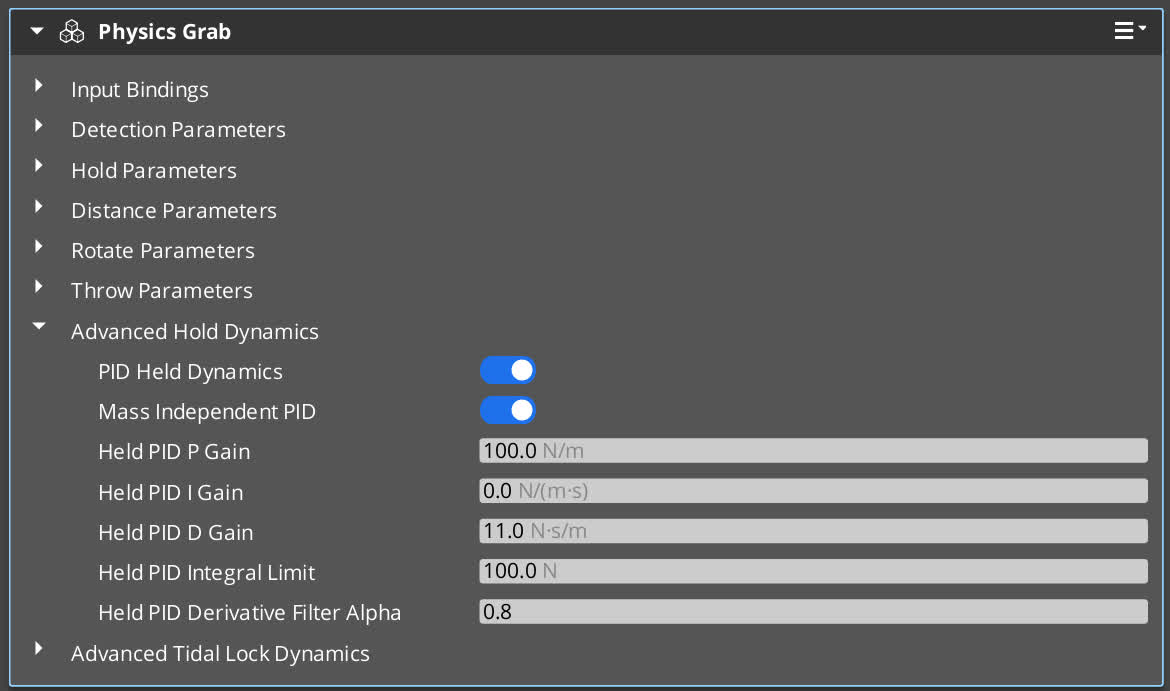
- PID Held Dynamics: Base throw strength for non-charged throws (higher = farther/faster throws; scales velocity if mass-independent).
- Mass Independent PID: Scales throw strength by mass for consistent velocity (enable for uniform throws; disable for heavier objects to throw shorter/slower).
- Held PID P Gain: Proportional gain for holding objects. Controls stiffness/pull strength (higher = stronger spring, quicker return but more oscillations).
- Held PID I Gain: Integral gain for holding. Reduces steady errors like gravity (higher = better offset correction, but risk of windup/overshoot; often low/zero).
- Held PID D Gain: Derivative gain for holding. Adds damping (higher = smoother motion, less oscillation; too high = sluggish response).
- Held PID Integral Limit: Caps integral buildup to prevent overshoot (higher = more correction allowance; prevents excessive windup).
- Held PID Derivative Filter Alpha: Filters derivative noise (higher = more smoothing, less jitter but delayed response). Values between 0.7-.09 is a good starting point.
Advanced Tidal Lock Dynamics
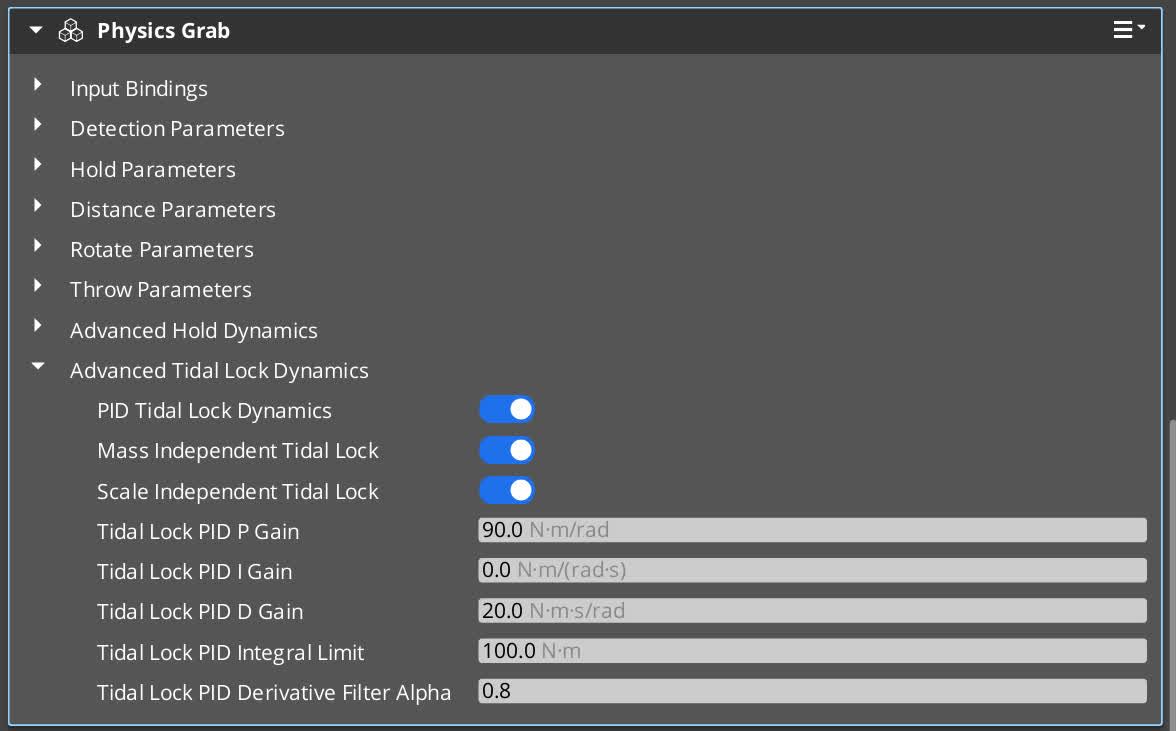
- PID Tidal Lock Dynamics: Scales PID by mass for uniform rotation (enable for consistent feel; disable for heavier objects to rotate slower).
- Mass Independent Tidal Lock: Scales PID by size-derived inertia (enable for consistent oscillations across scales; disable for larger objects to feel slower).
- Scale Independent Tidal Lock: Scales PID by size-derived inertia (enable for consistent oscillations across scales; disable for larger objects to feel slower).
- Tidal Lock PID P Gain: Proportional gain for tidal lock. Controls rotational stiffness (higher = quicker alignment, more oscillations).
- Tidal Lock PID I Gain: Integral gain for tidal lock. Fixes persistent rotation errors (higher = better correction, but risk of overshoot; often low/zero).
- Tidal Lock PID D Gain: Derivative gain for tidal lock. Adds rotational damping (higher = less wobble, smoother stop; too high = slow response).
- Tidal Lock PID Integral Limit: Limits integral buildup for stability (higher = more correction allowance; prevents excessive windup).
- Tidal Lock PID Derivative Filter Alpha: Filters derivative noise in tidal lock (higher = smoother but delayed).Values between 0.7-.09 is a good starting point.
And that’s it! You now have a full physics-based grab system that lets players interact with your game world in a meaningful, immersive way.
And if you want to go deeper, the Physics Grab gem also includes many script canvas nodes and Lua request bus methods for scripting.
This gem is completely free and open source, so you can download, experiment, and even contribute to it on GitHub.
Watch the full Physics Grab Tutorial here!
If you want to learn more from Porcupine Factory, join the O3DE community on Wednesday, October 8 at 8 am PT for the monthly Open 3D Connect meeting. Add this meeting to your calendar or watch past videos here.